IaC Lab 2 – Using GitLab CI to run Ansible playbooks and build new Debian GNU/Linux Virtual Machines
Copyright © 2025 Philippe Latu.
Permission is granted to copy, distribute and/or modify this document under the
terms of the GNU Free Documentation License, Version 1.3 or any later version
published by the Free Software Foundation; with no Invariant Sections, no
Front-Cover Texts, and no Back-Cover Texts. A copy of the license is included
in the section entitled “GNU Free Documentation License”.
GitLab repository: https://gitlab.inetdoc.net/iac/lab-01-02/
Scenario
This lab will introduce you to the basics of using GitLab CI/CD to automate the building of Debian GNU/Linux virtual machines through a pipeline. We move from the development area (Lab 01) to the testing area (this lab) since all Ansible playbooks are available in a Git repository stored on a GitLab instance.
We made a questionable choice here.
To avoid using multiple cloud services, we chose a minimal GitLab CI/CD setup with a shell runner and the following two arguments:
- Ansible vault secrets are already stored on the DevNet virtual machine user account and we do not use a cloud provider.
- The dynamic inventory is generated from a Python script run by a playbook and does not rely on any external service.
Objectives
After completing the manipulation steps in this document, you will be able to:
- Install and configure GitLab Runner on the DevNet virtual machine to enable CI/CD pipeline execution.
- Create and test a basic
.gitlab-ci.ymlfile to ensure proper integration between GitLab and the runner. - Set up a multi-stage CI pipeline that incorporates Ansible playbooks for automating virtual machine creation and configuration.
- Implement artifact management to ensure proper file retention and sharing between pipeline stages.
- Successfully run a complete CI pipeline that automates the entire process of creating and configuring Debian GNU/Linux virtual machines.
Part 1: Install and configure GitLab Runner on the DevNet virtual machine
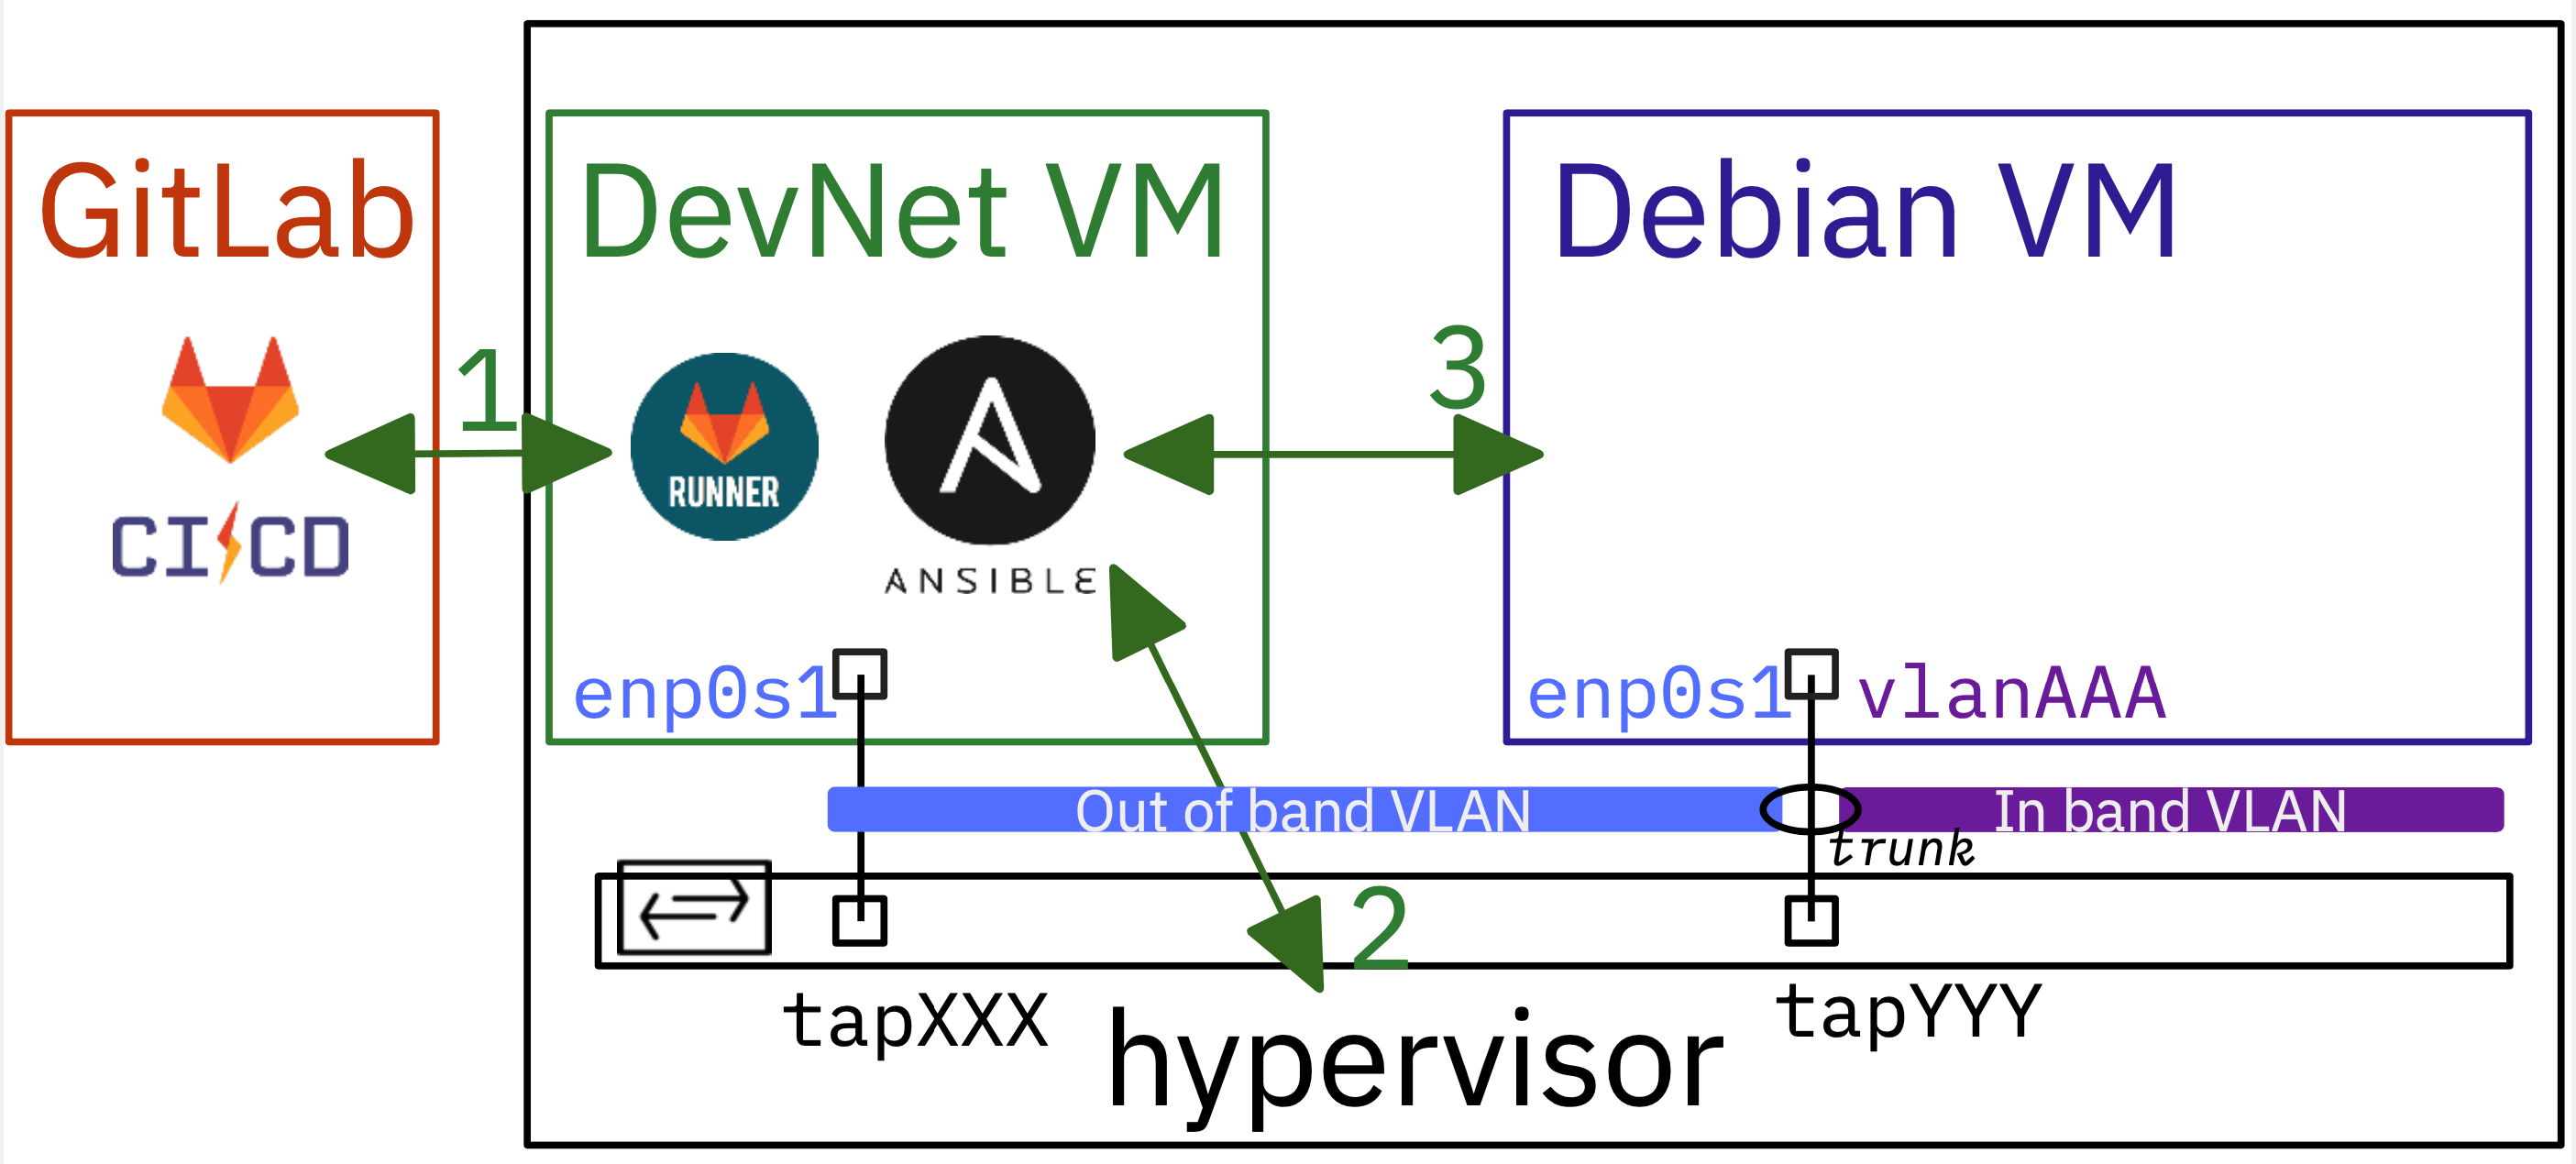
The diagram above illustrates the need to establish communication between two different entities: the GitLab service, which is hosted on a separate machine from the hypervisor, and the GitLab runner, which must be installed on the DevNet virtual machine.
First, we will install and configure the GitLab runner. Next, we will create a new runner using the GitLab web interface. The token generated during this process will be required to register this new runner.
Step 1: Install gitlab-runner package
The GitLab Runner is available as a Debian package. To install it, a Debian package repository must be added to the sources along with a signing key to check package integrity.
- Download and save the GPG public signing key
curl -fsSL https://packages.gitlab.com/runner/gitlab-runner/gpgkey |\
sudo gpg --dearmor -o /usr/share/keyrings/runner_gitlab-runner-archive-keyring.gpg
- Add the new repository source file
echo "deb [signed-by=/usr/share/keyrings/runner_gitlab-runner-archive-keyring.gpg] \
https://packages.gitlab.com/runner/gitlab-runner/debian/ trixie main" |\
sudo tee /etc/apt/sources.list.d/runner_gitlab-runner.list
- Update package list and install gitlab-runner
sudo apt update && sudo apt -y install gitlab-runner
- Check gitlab-runner service status
systemctl status gitlab-runner.service
● gitlab-runner.service - GitLab Runner
     Loaded: loaded (/etc/systemd/system/gitlab-runner.service; enabled; preset: enabled)
     Active: active (running) since Thu 2024-03-07 09:56:44 CET; 2min 9s ago
   Main PID: 10258 (gitlab-runner)
      Tasks: 9 (limit: 9455)
     Memory: 11.3M (peak: 14.1M)
        CPU: 142ms
     CGroup: /system.slice/gitlab-runner.service
             └─10258 /usr/bin/gitlab-runner run --working-directory /home/gitlab-runner --config /etc/gitlab-runner/config.toml --service gitlab-runner --user gitlab-runner

mars 07 09:56:44 devnet24 systemd[1]: Started gitlab-runner.service - GitLab Runner.
mars 07 09:56:44 devnet24 gitlab-runner[10258]: Runtime platform                                    arch=amd64 os=linux pid=10258 revision=782c6ecb version=16.9.1
mars 07 09:56:44 devnet24 gitlab-runner[10258]: Starting multi-runner from /etc/gitlab-runner/config.toml...  builds=0 max_builds=0
mars 07 09:56:44 devnet24 gitlab-runner[10258]: Running in system-mode.
mars 07 09:56:44 devnet24 gitlab-runner[10258]:
mars 07 09:56:44 devnet24 gitlab-runner[10258]: Created missing unique system ID                    system_id=s_a345ff83db78
mars 07 09:56:44 devnet24 gitlab-runner[10258]: Configuration loaded                                builds=0 max_builds=1
mars 07 09:56:44 devnet24 gitlab-runner[10258]: listen_address not defined, metrics & debug endpoints disabled  builds=0 max_builds=1
mars 07 09:56:44 devnet24 gitlab-runner[10258]: [session_server].listen_address not defined, session endpoints disabled  builds=0 max_builds=1
mars 07 09:56:44 devnet24 gitlab-runner[10258]: Initializing executor providers                     builds=0 max_builds=1
The results of the above commands give us some interesting information about the GitLab Runner service:
- The service is up and running
- It runs under the user identity
gitlab-runner - The service configuration file is:
/etc/gitlab-runner/config.toml - The listen_address is not defined. So we need to define it!
Step 2: Configure gitlab-runner service listen and advertise addresses
The initial content of the gitlab-runner service configuration file is as follows:
concurrent = 1
check_interval = 0
shutdown_timeout = 0

[session_server]
  session_timeout = 1800
We must add two new address entries in the [session_server] category. For convenience, we choose the DevNet IPv6 address as our advertise_address.
cat <<EOF | sudo tee -a /etc/gitlab-runner/config.toml
  listen_address = "[::]:8093"
  advertise_address = "[2001:678:3fc:VVV:baad:caff:fefe:XXX]:8093"
EOF
Edit the IPv6 advertised address in the above command to match that of your own DevNet virtual machine.
After editing the configuration file, you must restart the service and verify that it is listening on port 8093.
sudo systemctl restart gitlab-runner.service
sudo lsof -i tcp:8093
COMMAND    PID USER   FD   TYPE DEVICE SIZE/OFF NODE NAME
gitlab-ru 8871 root    3u  IPv6  42430      0t0  TCP *:8093 (LISTEN)
Step 3: Create a new runner from the GitLab website
To create a new runner, access the GitLab web interface. The runner creation process provides a unique token that is used to register the gitlab-runner service with the GitLab instance on the DevNet virtual machine.
The standard practice is to create a runner at the group level. This allows the runner to be shared by all the projects (i.e. Git repositories) that belong to the group.
We will start by selecting a group and then create a new runner for that group.
-
Select a group

-
From the left panel, select Runners

-
Complete the new group runner form
In our context, we have chosen the following form elements:
- Linux as the runner execution platform
- Run untagged jobs
- Runner description
- Maximum job timeout set to 600
Click on the option Create runner located at the bottom of the page…

-
Create runner
The most important information on this page is the token that establishes the relationship between the GitLab service and the runner on the DevNet virtual machine.

Step 4: Register the DevNet runner to the GitLab service
Return to the DevNet virtual machine and execute the gitlab-runner command to finalize the registration process.
sudo gitlab-runner register --non-interactive \
    --executor "shell" \
    --url "https://gitlab.inetdoc.net/" \
    --token "glrt-XXXXXXXXXXXXXXXXXXXX"
Runtime platform               arch=amd64 os=linux pid=35760 revision=782c6ecb version=16.9.1
Running in system-mode.

Verifying runner... is valid   runner=Hc23EDu4b
Runner registered successfully. Feel free to start it, but if it's running already the config should be automatically reloaded!

Configuration (with the authentication token) was saved in "/etc/gitlab-runner/config.toml"
Once the registration is complete, we can verify that the relationship has been correctly established on the Runners Page.

Part 2: Setup a first GitLab CI test pipeline
Now that the relationship between the GitLab instance and its runner has been established, we are ready to test a first Continuous Integration (CI) atomic pipeline. Following the Lab 01 scenario we will run the Ansible ad hoc command with the ping module to verify connectivity between the DevNet virtual machine and the hypervisor.
Step 1: Copy secrets to the gitlab-runner user account
As mentioned in the lab introduction, a centralized identity and secrets management solution is not used to limit the complexity of the architecture. All identities and secrets are stored in the DevNet virtual machine.
In context of the continuous integration pipeline, the ansible command is executed using the gitlab-runner user account. Therefore, the vault and its password must be copied from the user account used during the initial development phase (i.e., the Lab 01) to the gitlab-runner user account.
Here is a copy of the share_secrets.sh Bash script:
#!/usr/bin/env bash

# The purpose of this script is to copy secrets from the developer's home
# directory to the Gitlab Runner's home directory.
# Exit on error, undefined var, pipe failure

set -euo pipefail

# Constants
readonly DEV_USER="etu"
readonly PROJECT_NAME="iac"
readonly RUNNER_HOME="/home/gitlab-runner"
readonly DEV_HOME="/home/${DEV_USER}"
readonly RUNNER_SSH_DIR="${RUNNER_HOME}/.ssh"

# Function to handle errors
error_exit() {
	echo "ERROR: $1" >&2
	exit 1
}

# Function to copy and set permissions
secure_copy() {
	local src="$1"
	local dest="$2"
	local mode="${3:-600}"

	[[ -f ${src} ]] || error_exit "Source file ${src} not found"
	cp "${src}" "${dest}" || error_exit "Failed to copy ${src} to ${dest}"
	chmod "${mode}" "${dest}"
	chown gitlab-runner:gitlab-runner "${dest}"
}

# Check if running as root
[[ ${EUID} -eq 0 ]] || error_exit "This script must be run as root"

echo "Setting up secrets for Gitlab Runner..."

# Setup Vault files
secure_copy "${DEV_HOME}/.${PROJECT_NAME}.passwd" "${RUNNER_HOME}/.${PROJECT_NAME}.passwd"
secure_copy "${DEV_HOME}/.vault.passwd" "${RUNNER_HOME}/.vault.passwd"

# Setup profile
PROFILE="${RUNNER_HOME}/.profile"
touch "${PROFILE}"
echo "export ANSIBLE_VAULT_PASSWORD_FILE=${RUNNER_HOME}/.vault.passwd" >"${PROFILE}"
chown gitlab-runner:gitlab-runner "${PROFILE}"
chmod 644 "${PROFILE}"

# Setup SSH directory
mkdir -p "${RUNNER_SSH_DIR}"
chmod 700 "${RUNNER_SSH_DIR}"
chown gitlab-runner:gitlab-runner "${RUNNER_SSH_DIR}"

# Copy SSH files
if [[ -f "${DEV_HOME}/.ssh/config" ]]; then
	secure_copy "${DEV_HOME}/.ssh/config" "${RUNNER_SSH_DIR}/config" 644
fi

# Copy all SSH keys
for key in "${DEV_HOME}"/.ssh/id_*; do
	[[ -f ${key} ]] || continue
	secure_copy "${key}" "${RUNNER_SSH_DIR}/$(basename "${key}")"
done

echo "Secrets setup completed successfully"
exit 0
This script copies authentication and configuration files from a developer account to the GitLab Runner account.
Requirements
- Must be run as root
- Developer account must exist
- GitLab Runner must be installed
What the script does
-
Copies vault files:
.iac_passwd.yml: the vault itself.vault.passwd: the vault key
-
Sets up environment:
- Creates
.profilewith vault password path - Sets correct permissions
- Creates
-
Configures SSH:
- Creates
.sshdirectory - Copies SSH config
- Copies all SSH keys
- Creates
Security measures
- Sets restricted file permissions (600)
- Sets correct ownership
- Validates source files existence
- Handles errors with proper messages
Usage
sudo bash ./share_secrets.sh
Step 2: Create a first .gitlab-ci.yml file
For this initial test of Continuous Integration, we have to create a minimal .gitlab-ci.yml file. This will prove that the integration is properly configured and running.
variables:
  PIP_CACHE_DIR: $CI_PROJECT_DIR/.cache/pip
  VAULT_FILE: /home/gitlab-runner/.iac_passwd.yml

cache:
  paths:
    - .cache/pip
    - ansible/

stages:
  - Build
  - Ping

Build venv:
  stage: Build
  script:
    - python3 -m venv ansible
    - source ./ansible/bin/activate
    - pip3 install --upgrade -r requirements.txt

Ping hypervisors:
  stage: Ping
  needs:
    - Build venv
  script:
    - source ./ansible/bin/activate
    - ansible hypervisors -m ping --extra-vars "@${VAULT_FILE}"
- What are the stages of a CI pipeline in GitLab?
- Stages in a GitLab CI pipeline act as organizational units that group related tasks together. They play a key role in controlling the flow and execution order of your CI/CD process.
In this first CI test, we only have two stages called Build and Ping. - What are the jobs of a CI pipeline in GitLab?
- Jobs are the smallest executable units in a GitLab CI pipeline. They represent individual, atomic tasks that perform specific actions within a CI/CD process.
In our context, there is a first job called Build venv, which belongs to the Build stage, and a second job called Ping hypervisors which belongs to the Ping stage and calls Ansible using the script command. - What is the role of the
needskeyword in a job? - This feature allows us to specify job dependencies, where a job must successfully complete (or sometimes be allowed to fail) other jobs before it can begin execution.
This dependency management helps prevent downstream jobs from failing due to missing artifacts or incomplete tasks from earlier jobs. It results in a more reliable and predictable CI pipeline execution.
Make sure that CI/CD is enabled for your GitLab project.
Go to project Settings, then Visibility, project features, permissions, and scroll down to CI/CD.
Finally, do not forget to Save changes at the bottom of the category.

Step 3: Continuous Integration pipeline execution
After committing and pushing the .gitlab-ci.yml to the Git repository, the runner on the DevNet virtual machine executes the pipeline jobs. The results are available via the GitLab web service.
From the left panel of the Lab-01-02 project page, select Pipelines under the Build main item.

Under the Build section, selecting Jobs will display the results of the Ansible command.

The same results are also available through the VSCode GitLab extension panel.

Now that we have successfully run our first continuous integration job, we can move forward by adding stages and running Ansible playbooks as jobs.
Step 4: Set up a new SSH configuration file for the gitlab-runner user account
Since we use IPv6 link local addresses to manage each virtual machine or virtual router, there may be address conflicts with SSH connections from the gitlab-runner user account. When a virtual machine is reinstantiated, its SSH server keys are renewed, even though its management interface link local address was previously used and stored in the SSH known_hosts file. This causes an error each time a new SSH connection is attempted.
To work around this problem, we need to specify that IPv6 link local addresses are not to be stored when an SSH connection is made to a new virtual machine or router. This is done by adding instructions to the gitlab-runner user’s .ssh/config file.
cat << EOF | sudo tee -a /home/gitlab-runner/.ssh/config

Host fe80::*
    CheckHostIP no
    StrictHostKeyChecking no
    UserKnownHostsFile=/dev/null
EOF
With these configuration instructions in place, we won’t encounter SSH connection errors during the Gather Facts playbook task.
Part 3: Build a pipeline with Ansible playbooks
The next step is to run all the Ansible playbooks created in Lab 01 by defining new stages and jobs in the .gitlab-ci.yml file. This will allow us to fully automate the creation of virtual machines and complete our Infrastructure as Code scenario.
Step 1: Add a new prepare stage to the pipeline
As a reminder, the purpose of the 01_prepare.yml Ansible playbook in Lab 01 is to set up all the required directories and symlinks needed to run virtual machines on hypervisors. It also configures the switch ports that will be used by the virtual machines to be created.
In this section, we add a new stage called Prepare to the .gitlab-ci.yml file with a dependency relationship to the previous Ping stage. Here is a copy of the new version of the .gitlab-ci.yml file:
variables:
  PIP_CACHE_DIR: $CI_PROJECT_DIR/.cache/pip
  VAULT_FILE: /home/gitlab-runner/.iac_passwd.yml

cache:
  paths:
    - .cache/pip
    - ansible/

stages:
  - Build
  - Ping
  - Prepare

Build venv:
  stage: Build
  script:
    - python3 -m venv ansible
    - source ./ansible/bin/activate
    - pip3 install --upgrade -r requirements.txt

Ping hypervisors:
  stage: Ping
  needs:
    - Build venv
  script:
    - source ./ansible/bin/activate
    - ansible hypervisors -m ping --extra-vars "@${VAULT_FILE}"

Prepare lab env:
  stage: Prepare
  artifacts:
    paths:
      - trace
  needs:
    - Ping hypervisors
  script:
    - source ./ansible/bin/activate
    - ansible-playbook 01_prepare.yml --extra-vars "@${VAULT_FILE}"
Here is a short description of the key tasks:
- Build Virtual Environment
-
- Stage: Build
- Task: Creates a Python virtual environment and installs required packages.
- Ping Hypervisors
-
- Stage: Ping
- Task: Checks connectivity to hypervisors using Ansible ping module.
- Prepare Lab Environment
-
- Stage: Prepare
- Task: Runs an Ansible playbook to set up the lab environment.
- Additional Features
-
- Caching: Implements caching for pip packages and Ansible files.
- Variables: Defines custom variables for pip cache directory and vault file location.
- Artifacts: Preserves the ‘trace’ file from the “Prepare lab env” job.
- Security Note
- Sensitive information is stored in a vault file (
/home/gitlab-runner/.iac_passwd.yml) and passed to Ansible using the--extra-varsoption.
The GitLab web service provides a graphical illustration of this dependency relationship.

Step 2: Illustrate pipeline failure without artifacts
As we can read about DevOps paradigms: “Failure is normal!”.
The key pillar of the DevOps philosophy is to accept failure as normal. It shows that failures are normal and should be expected. Organizations should view them as another opportunity to strengthen and improve their infrastructure.
So what about the failure of our own pipeline? Here is an intentionally broken version of the .gitlab_ci.yml file with all the stages added.
Lines from 43 to 46 are commented out to avoid storing and persisting artifacts between “Build and launch vms” and “Configure vms” jobs.
variables:
  PIP_CACHE_DIR: $CI_PROJECT_DIR/.cache/pip
  VAULT_FILE: /home/gitlab-runner/.iac_passwd.yml

cache:
  paths:
    - .cache/pip
    - ansible/

stages:
  - Build
  - Ping
  - Prepare
  - Pull_customize_run
  - Configure

Build venv:
  stage: Build
  script:
    - python3 -m venv ansible
    - source ./ansible/bin/activate
    - pip3 install --upgrade -r requirements.txt

Ping hypervisors:
  stage: Ping
  needs:
    - Build venv
  script:
    - source ./ansible/bin/activate
    - ansible hypervisors -m ping --extra-vars "@${VAULT_FILE}"

Prepare lab env:
  stage: Prepare
  artifacts:
    paths:
      - trace
  needs:
    - Ping hypervisors
  script:
    - source ./ansible/bin/activate
    - ansible-playbook 01_prepare.yml --extra-vars "@${VAULT_FILE}"

Build and launch vms:
  stage: Pull_customize_run
  #  artifacts:
  #    paths:
  #      - inventory
  #      - trace
  needs:
    - Prepare lab env
  script:
    - source ./ansible/bin/activate
    - ansible-playbook 02_pull_customize_run.yml --extra-vars "@${VAULT_FILE}"

Configure vms:
  stage: Configure
  needs:
    - Build and launch vms
  script:
    - source ./ansible/bin/activate
    - ansible-playbook 03_system_bits.yml --extra-vars "@${VAULT_FILE}"
The last “Configure” stage fails for SSH connections to the newly created virtual machines.
So how do you find the error messages?

One way is to click on the failed stage on the GitLab pipeline web page.

Another way is to use the VSCode extension to view the same error messages.
Error messages indicate that the virtual machine names are not resolved and SSH connection attempts fail. The VScode screenshot above shows that the lab.yaml inventory file is missing from the inventory directory. The first assumption is that the dynamic inventory build Python script may have failed during the vms_build stage.
This assumption is actually incorrect.
Let’s try to find out what happened by looking at the job console results from lines 9 through 14.
Reinitialized existing Git repository in /home/gitlab-runner/builds/t2_zTzkNg/0/iac/lab-01-02/.git/
Checking out 72c5b340 as detached HEAD (ref is main)...
Removing .cache/
Removing ansible/
Removing inventory/lab.yml
Removing trace/
Here we can see that files and directories were deleted in the early steps of the Configure stage. So when the Ansible playbook runs, the inventory is incomplete because the inventory/lab.yml file was deleted before it started.
The current state of our pipeline is that there is no retention of files and directories created during a job. This leads to the concept of artifacts.
- What are artifacts in a GitLab Continuous Integration (CI) pipeline?
- Artifacts serve as a mechanism for storing and sharing files generated during pipeline execution. These artifacts, typically files or directories, are stored on the GitLab server after a particular job completes. Subsequent jobs within the pipeline can then download and use these artifacts.
To fix our problem, we need to add an artifacts keyword list to the Build and launch vms job, which will share the contents of the inventory directory with other jobs. The new version of Build and launch vms may be:
Build and launch vms:
  stage: Pull_customize_run
  artifacts:
    paths:
      - inventory
      - trace
  needs:
    - Prepare lab env
  script:
    - source ./ansible/bin/activate
    - ansible-playbook 02_pull_customize_run.yml --extra-vars "@${VAULT_FILE}"
Step 3: Run the complete CI pipeline
At the end of this lab, we will successfully run the complete GitLab continuous integration pipeline.
Here is a screenshot of the GitLab website showing that all stages have been successfully completed.

Here is another screenshot to illustrate the artifacts stored in the GitLab service.

And, of course, the two new virtual machines are now fully functional and available to start a brand new lab.
Conclusion
In summary, this lab demonstrates the power of Infrastructure as Code (IaC) and Continuous Integration/Continuous Deployment (CI/CD) in automating the creation and configuration of virtual machines. By leveraging GitLab CI, Ansible playbooks, and a series of well-defined pipeline stages, the process of setting up a lab environment has been streamlined and made repeatable.
Key takeaways include:
-
The importance of proper GitLab runner setup and configuration
-
The value of breaking down complex tasks into distinct pipeline stages
-
The critical role of artifacts in maintaining state between jobs
-
The need for error handling and troubleshooting in CI/CD pipelines
This lab provides a solid foundation for further exploration of IaC and CI/CD concepts, preparing students for real-world scenarios where these technologies are increasingly essential.