# IaC Lab 1 -- Use Ansible to build new Debian GNU/Linux Virtual Machines
[toc]
---
> Copyright (c) 2024 Philippe Latu.
Permission is granted to copy, distribute and/or modify this document under the
terms of the GNU Free Documentation License, Version 1.3 or any later version
published by the Free Software Foundation; with no Invariant Sections, no
Front-Cover Texts, and no Back-Cover Texts. A copy of the license is included
in the section entitled "GNU Free Documentation License".
GitLab repository: https://gitlab.inetdoc.net/iac/lab01
## Background / Scenario
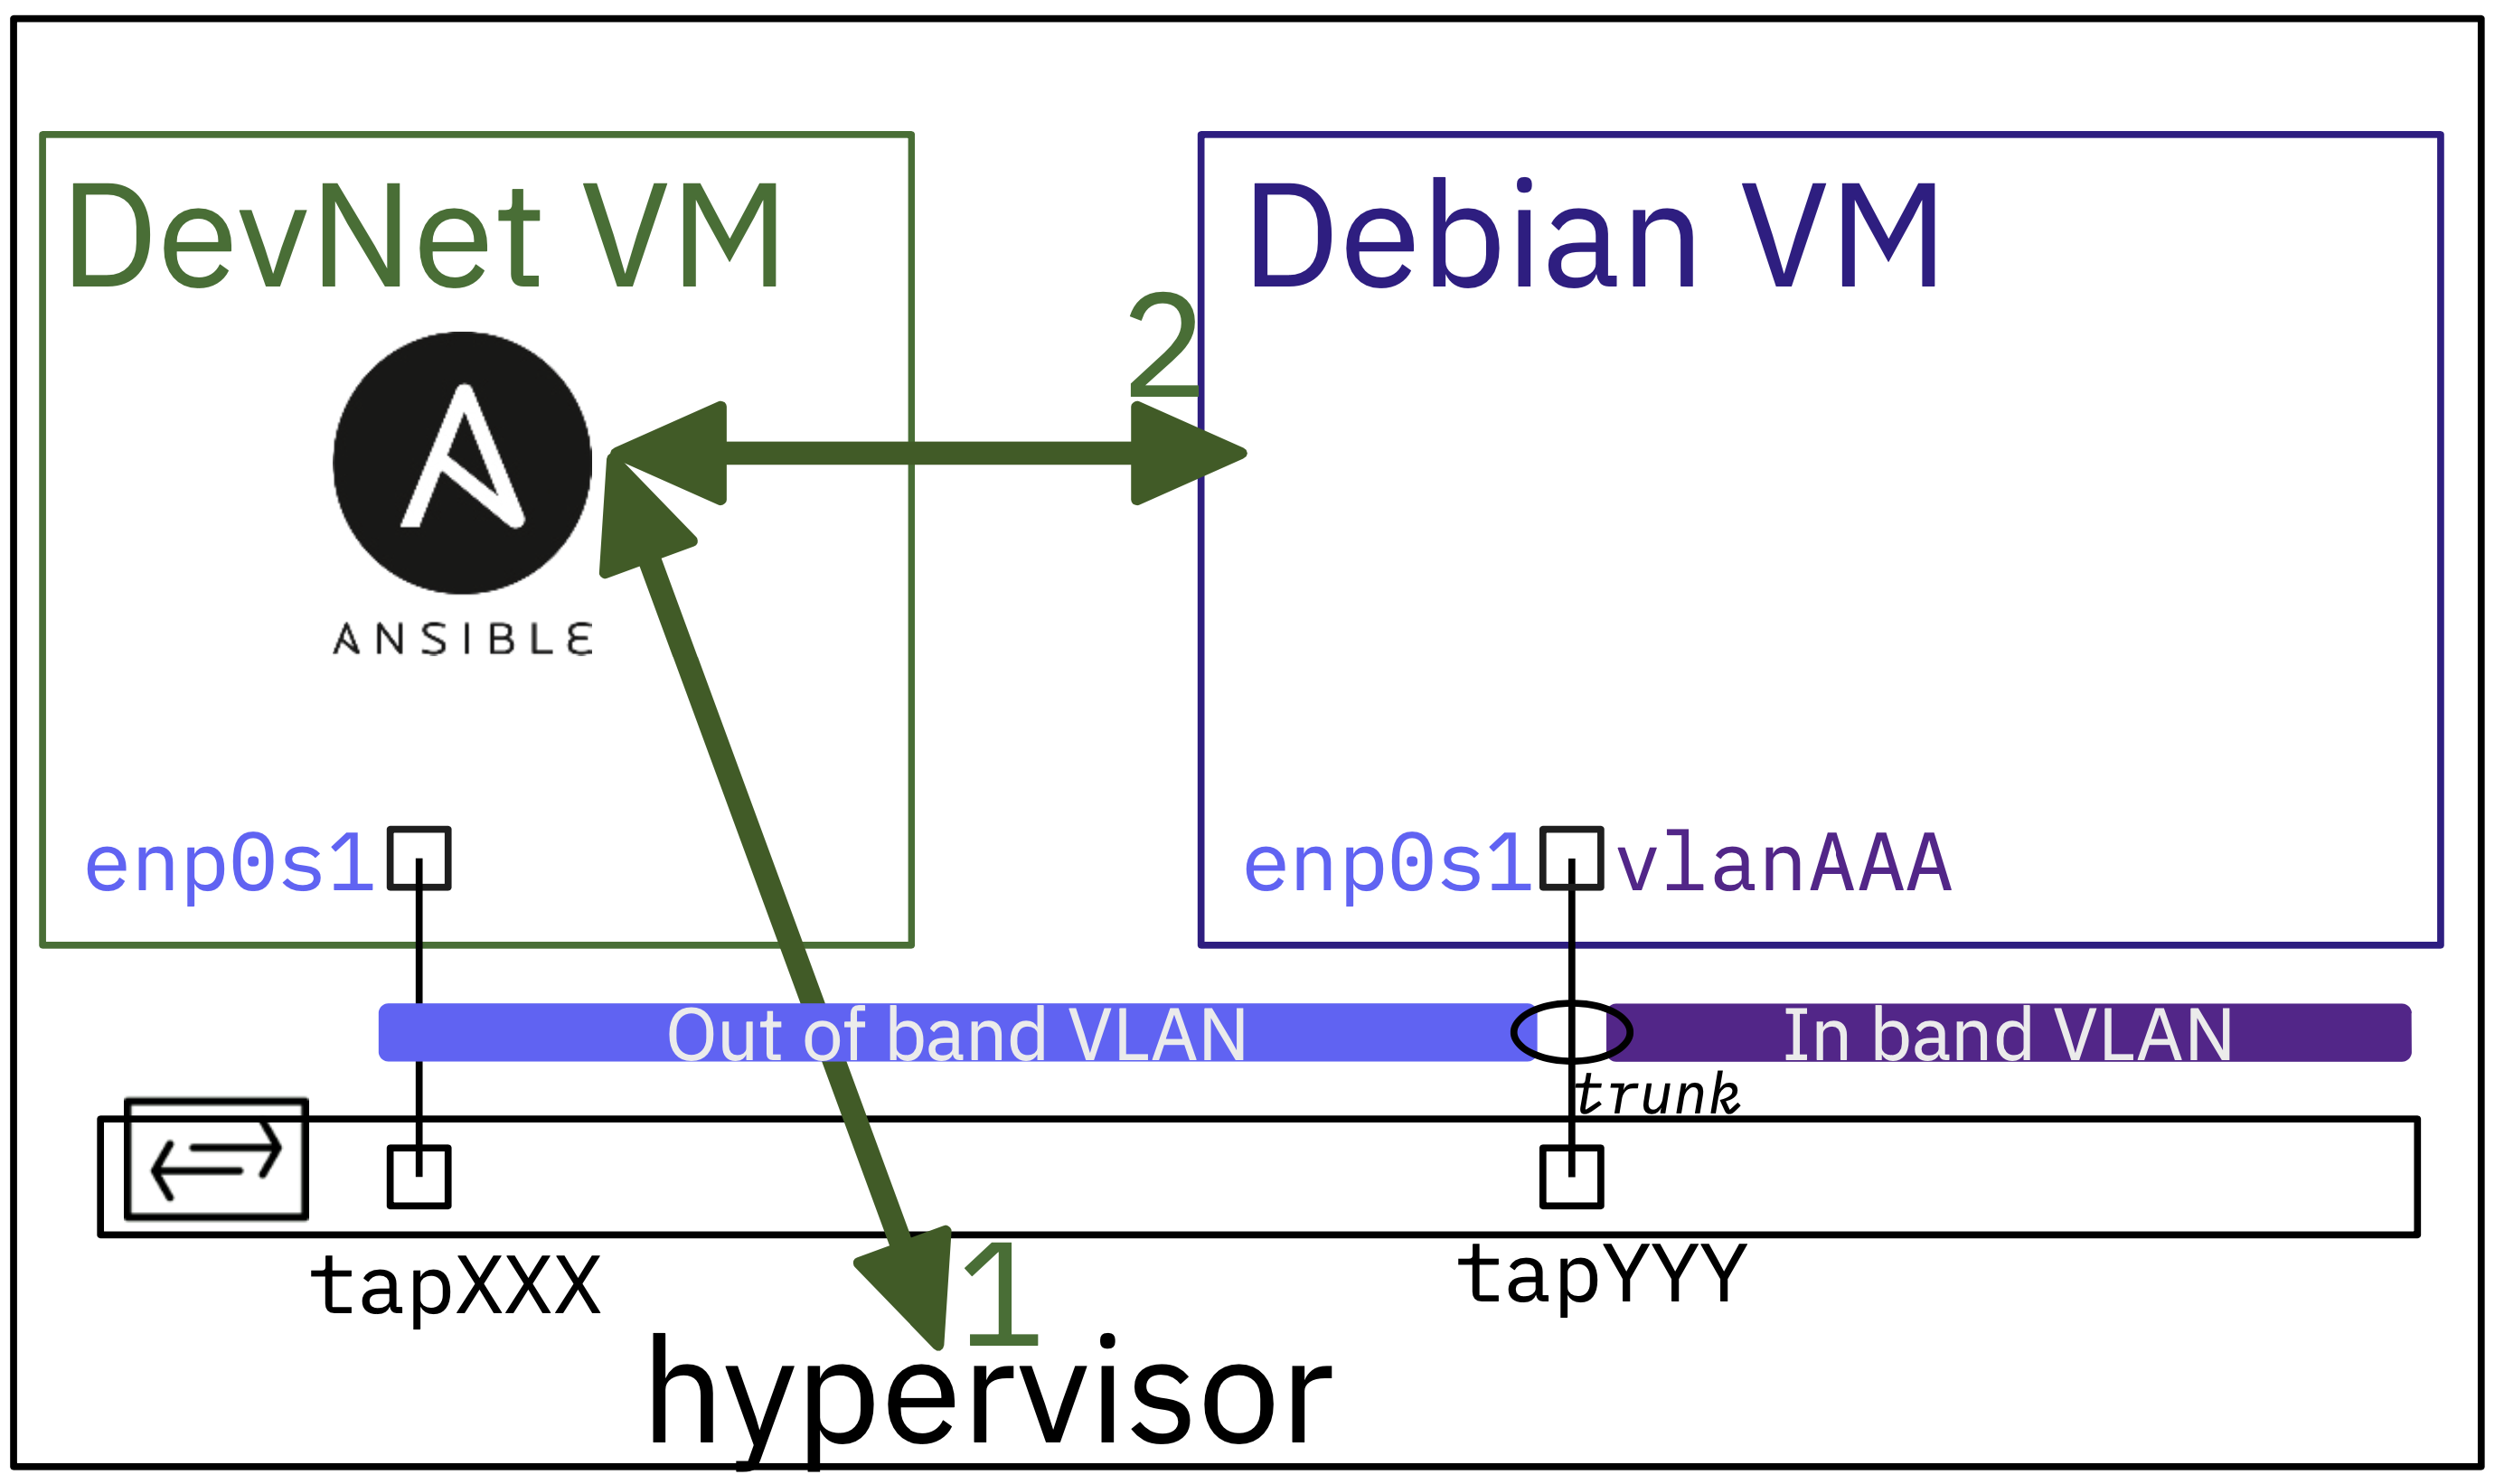
In this lab, you will explore the basics of using Ansible to build and customise Debian GNU/Linux virtual machines. This is a first illustration of the **Infrastructure as Code** (IaC) **push** method where the DevNet VM (controlling server) uses Ansible to build a new target system *almost* from scratch.
The main stages of the scenario are as follows:
1. We start at the Hypervisor shell level by pulling a virtual machine base image from [cloud.debian.org](https://cloud.debian.org/images/cloud/). Then we resize the main partition, and customize the virtual machine image files copied from the cloud image.
2. From the network point of view, virtual machines are customized to use **Virtual Routing and Forwarding** (VRF).
The main idea here is to set up a dedicated network to manage the VM from Ansible playbooks located on the DevNet VM. This management network must be isolated from other networks that the Debian VM would use.
3. Once the Debian VM has been properly customized, it can be started and configured with any Ansible playbooks.
We can connect them to any network or VLAN by configuring new interfaces. In this context, the Debian virtual machines must be connected to a switch port in **trunk** mode to enable the use of VLAN tags to identify the relevant broadcast domains.
# Part 1: Configure Ansible on the DevNet VM
First, we need to configure Ansible and check that we have access to the hypervisor from the DevNet VM via SSH.
## Step 1: Create the Ansible directory and configuration file
1. Make the `~/iac/lab01` directory for example and navigate to this folder
```bash
mkdir -p ~/iac/lab01 && cd ~/iac/lab01
```
2. Check that **ansible** is installed
There are two main ways to set up a new Ansible workspace. Packages and Python virtual environments are both viable options. Both methods have their advantages and disadvantages.
- If we wish to use the Ansible package provided by the Linux distribution, the tool will be immediately available. However, difficulties may arise with modules that are not up to date or aligned with Python repositories. With an Ubuntu distribution, the package information is as follows:
```bash
apt show ansible | head -n 10
```
```bash=
Package: ansible
Version: 7.7.0+dfsg-1
Priority: optional
Section: universe/admin
Origin: Ubuntu
Maintainer: Ubuntu Developers <ubuntu-devel-discuss@lists.ubuntu.com>
Original-Maintainer: Lee Garrett <debian@rocketjump.eu>
Bugs: https://bugs.launchpad.net/ubuntu/+filebug
Installed-Size: 265 MB
Depends: ansible-core (>= 2.11.5-1~), python3:any, openssh-client | python3-paramiko (>= 2.6.0), python3-distutils, python3-dnspython, python3-httplib2, python3-jinja2, python3-netaddr, python3-yaml
```
- To utilize the latest versions of tools in Python, we can create a virtual environment by following these steps:
Still with an Ubuntu distribution:
```bash=
cat << EOF > requirements.txt
ansible
ansible-lint
EOF
```
```bash=
python3 -m venv ansible
source ./ansible/bin/activate
pip3 install -r requirements.txt
```
3. Create a new `ansible.cfg` file in the `lab01` directory from the shell prompt
{%gist platu/e5a71ea5fdc67fa5478e7310eab81d5a%}
# Part 2: Designing the Declarative Part
Now that the Ansible automation tool is installed, it is time to plan the desired state of our laboratory infrastructure.
This is the most challenging aspect of the task as we begin with a blank screen. A starting point must be chosen, followed by a description of the expected results.
The approach chosen is to start at the bare-metal hypervisor level and then move on to the virtual machine and its network configuration.
- At system startup, all provisioned tap interfaces are owned by the type 2 hypervisor.
- These tap interfaces connect virtual machines to Open vSwitch switches, just like a patch cable. In addition, the tap interface names are used to designate the switch ports. All configuration instructions for switch ports use these tap interface names.
> In our context, we use a switch port in trunk mode to forward the traffic of multiple broadcast domains or VLANs. Each frame flowing through this trunk port uses an IEEE 802.1Q tag to identify the broadcast domain to which it belongs.
- Each virtual machine uses a tap interface number to connect its network interface to the switch port.
> In our context, we want the virtual machine network interface to use a dedicated virtual routing and forwarding (VRF) table for automation operations. Doing so, the virtual system network traffic and the automation traffic are completely independant and isolated.
- The VLAN used for automation operations is referred to as the **Out of Band** network, as it is exclusively reserved for management traffic and does not carry any user traffic.
- All the other VLANs used for laboratory traffic are referred to as the **In Band** network, as all user traffic flows through them.
Now that all statements are in place, they must be translated into YAML description files that reflect the desired state.
## Step 1: The inventory directory and its content
When using Ansible, it is important to differentiate between the inventory directory and the host variables directory.
We can start by creating the `inventory` and `host_vars` directories
```bash
mkdir ~/iac/lab01/{inventory,host_vars}
```
The inventory directory files contain the necessary information, such as host names, groups, and attributes, required to establish network connections with these hosts. Here is a copy of the `inventory/hosts.yml` file.
{%gist platu/84c2dd1d414e8f9b295924e38079b942%}
The YAML description above contains two groups: **hypervisors** and **VMs**. Within the hypervisors group, Bob is currently the only member present with the necessary SSH network connection parameters.
The VMs group comprises two members, namely **vmXXX** and **vmYYY**. At this stage, we do not know much except for the fact that we are going to instantiate two virtual machines.
The SSH network connection parameters for all virtual machines will be provided after they are started and the dynamic inventory Python script is executed.
## Step 2: The host_vars directory and its content
The content of the host_vars directory will now be examined.
YAML description files for each host of the lab infrastructure can be found there.
Here are copies of:
- `host_vars/bob.yml`
- `host_vars/vmXXX.yml`
- `host_vars/vmYYY.yml`
:warning: Be sure to edit this inventory file and replace the **XXX** and **YYY** placeholders with the corresponding real names.
{%gist platu/1312cb965502325f08bc5581f032192f%}
The hypervisor YAML file `bob.yml` contains a list of tap interfaces to be configured, as specified in the design. The configuration parameters for each tap interface listed include the switch name, trunk mode port, and the list of allowed VLANs in the trunk.
Other parameters relate to the image pull source that is common to all virtual machines in this lab.
The YAML files for virtual machines reference the hypervisor tap interface connection and contain the network interface **In Band** VLAN configuration parameters.
Notice that IPv4 addresses are calculated using the tap interface number. The intent is to avoid students to use the same IPv4 address for different virtual machines.
# Part 3: Access the hypervisor from the DevNet virtual machine using Ansible
Now that the minimum inventory and host variables are in place, it is necessary to verify hypervisor accessibility before pulling virtual machine images.
In this part, a vault is created to store all secrets on the DevNet virtual machine user home directory. As stated in the beginning of this lab, we are not utilizing an external service to handle confidential information.
## Step 1: Check SSH access from DevNet VM to the Hypervisor
We start with a shell test connection before to set up the configuration for **Ansible**.
One more time, be sure to change tap interface number to match your resource allocation.
```bash
ssh etudianttest@fe80:XXX::1%enp0s1
```
```bash=
ssh -p 2222 etudianttest@fe80:XXX::1%enp0s1
The authenticity of host '[fe80:XXX::1%enp0s1]:2222 ([fe80:XXX::1%enp0s1]:2222)' can't be established.
ED25519 key fingerprint is SHA256:xnQumIo5mnWNJh+Tcak0XmEAkxptGHpiFqd0BNLOMgo.
This key is not known by any other names.
Are you sure you want to continue connecting (yes/no/[fingerprint])? yes
Warning: Permanently added '[fe80:XXX::1%enp0s1]:2222' (ED25519) to the list of known hosts.
Linux bob 6.6.15-amd64 #1 SMP PREEMPT_DYNAMIC Debian 6.6.15-2 (2024-02-04) x86_64
```
## Step 2: Create a new vault file
Back to the DevNet VM console, create a new vault file called `iac_lab01_passwd.yml` and enter the unique vault password which will be used for all users passwords to be stored.
```bash
ansible-vault create $HOME/iac_lab01_passwd.yml
```
```bash=
New Vault password:
Confirm New Vault password:
```
This will open the default editor which is defined by the `$EDITOR` environment variable.
There we enter a variable name which will designate the password for Web server VM user account.
```bash
hypervisor_user: XXXXXXXXXX
hypervisor_pass: YYYYYYYYYY
vm_user: etu
vm_pass: ZZZZZZZZZ
```
## Step 3: Verify Ansible communication with the Hypervisor
Now, we are able to use the `ping` ansible module to commincate with the `bob` entry defined in the inventory file.
```bash
ansible bob -m ping --ask-vault-pass --extra-vars @$HOME/iac_lab01_passwd.yml
Vault password:
```
```bash=
bob | SUCCESS => {
"changed": false,
"ping": "pong"
}
```
As the ansible ping is successful, we can go on with playbooks to build new virtual machines.
# Part 4: Designing the procedural part
In [Part 2](#Part-2-Designing-the-Declarative-Part), lab design choices were translated into declarative YAML files to assess the desired state of the two virtual machines' network connections. Now, we need to use this declarative information in procedures to effectively build, customize, and run the virtual machines.
In order to be able to build and launch virtual machines, we first need to prepare directories and get access to virtual machines launch scripts. Next, we need to check that the switch port to which a virtual machine will be connected is in **trunk** mode.
## Step 1: Preparation stage at the Hypervisor level
This is a copy of the first Ansible Playbook, which includes two categories of procedures.
- In the initial phase, the tasks ensure that all the required directories and symlinks are in place in the user's home directory to run a virtual machine.
These operations are familiar to all students as they are provided at the top of each Moodle course page as shell instructions.
- In the second phase, the configuration of the tap switch ports is adjusted to match the attributes specified in the YAML file. In this particular lab context, each switch port is configured in trunk mode with a restricted list of allowed VLANs.
The playbook is designed for reusability and includes instructions for configuring switch ports in either access or trunk mode.
{%gist platu/ebf4e99f243766db3b612759c97d7c62%}
The playbook uses two Ansible modules: **file** and **shell**.
- [ansible.builtin.file module](https://docs.ansible.com/ansible/latest/collections/ansible/builtin/file_module.html) manages all types of files and their properties
- [ansible.builtin.shell module](https://docs.ansible.com/ansible/latest/collections/ansible/builtin/shell_module.html) executes shell commands on target hosts.
The most interesting aspects of the shell tasks are:
- Using messages sent to standard output to determine whether or not a configuration change has occurred. Look for the `changed_when:` keyword in the playbook code.
- Using item attributes to know whether or not to run a task. Look for the `when:` keyword in the playbook code.
- Using item attributes to also know if a task has failed or not. Look for the `failed_when:` keyword in the same code.
When we run the playbook, we get the following output.
```bash
ansible-playbook prepare.yml --ask-vault-pass --extra-vars @$HOME/iac_lab01_passwd.yml
Vault password:
```
```bash=
PLAY [PREPARE LAB ENVIRONMENT] *************************************************
TASK [Gathering Facts] *********************************************************
ok: [bob]
TASK [ENSURE SYMLINK TO MASTERS DIRECTORY EXISTS] ******************************
ok: [bob]
TASK [ENSURE VM DIRECTORY EXISTS] **********************************************
ok: [bob]
TASK [ENSURE SYMLINK TO SCRIPTS DIRECTORY EXISTS] ******************************
ok: [bob]
TASK [ENSURE LAB DIRECTORY EXISTS] *********************************************
ok: [bob]
TASK [CHECK IF TAP INTERFACES ARE ALREADY USED BY ANOTHER USER] ****************
ok: [bob] => (item={'name': 'tap4', 'vlan_mode': 'trunk', 'trunks': [0, 28, 230], 'link': 'vmXXX', 'switch': 'dsw-host'})
ok: [bob] => (item={'name': 'tap5', 'vlan_mode': 'trunk', 'trunks': [0, 28, 230], 'link': 'vmYYY', 'switch': 'dsw-host'})
TASK [CONFIGURE TAP INTERFACES SWITCH CONNECTION] ******************************
ok: [bob] => (item={'name': 'tap4', 'vlan_mode': 'trunk', 'trunks': [0, 28, 230], 'link': 'vmXXX', 'switch': 'dsw-host'})
ok: [bob] => (item={'name': 'tap5', 'vlan_mode': 'trunk', 'trunks': [0, 28, 230], 'link': 'vmYYY', 'switch': 'dsw-host'})
TASK [CONFIGURE TAP INTERFACES IN ACCESS MODE] *********************************
skipping: [bob] => (item={'name': 'tap4', 'vlan_mode': 'trunk', 'trunks': [0, 28, 230], 'link': 'vmXXX', 'switch': 'dsw-host'})
skipping: [bob] => (item={'name': 'tap5', 'vlan_mode': 'trunk', 'trunks': [0, 28, 230], 'link': 'vmYYY', 'switch': 'dsw-host'})
skipping: [bob]
TASK [CONFIGURE TAP INTERFACES IN TRUNK MODE] **********************************
ok: [bob] => (item={'name': 'tap4', 'vlan_mode': 'trunk', 'trunks': [0, 28, 230], 'link': 'vmXXX', 'switch': 'dsw-host'})
ok: [bob] => (item={'name': 'tap5', 'vlan_mode': 'trunk', 'trunks': [0, 28, 230], 'link': 'vmYYY', 'switch': 'dsw-host'})
PLAY RECAP *********************************************************************
bob : ok=8 changed=0 unreachable=0 failed=0 skipped=1 rescued=0 ignored=0
```
## Step 2: Develop scripts to resize, customize, and create inventory entry
Bash and Python scripts were chosen to separate operations.
### Increase virtual machine storage capacity
Once the generic cloud image file is pulled from [cloud.debian.org](), we first have to resize its main partition to increase storage space.
Here is the `resize.sh` script which is based on `qemu-img` and `virt-resize` commands. The function takes two input parameters: the filename of the virtual machine image and the desired storage capacity to be added.
{%gist platu/80abe91df20868cc8e49e1de0f23a8ed%}
### Customize virtual machine
The second script, called `customize.sh`, is more complex, since it performs several tasks. All these tasks are controlled by the `virt-customize` command. Below is a list of the processing performed on the four input parameters.
- Create a user account, set its password and add it to system groups `sudo` and `adm`
- Set the timezone
- Prepare and copy all the network configuration files into the virtual machine `/etc/systemd/network/` virtual machine directory
- Reconfigure SSH service to allow password connection on port 2222
Here is the `customize.sh` script source code with its input parameters:
- virtual machine image filename
- user name to be used for Ansible SSH connections
- user password extracted from Ansible vault
- Out of band VLAN identifier
{%gist platu/1fd65398266c1cb10db581018acdfb10%}
### Build dynamic inventory
After launching virtual machines, we must update the Ansible inventory with a new YAML file created from the output messages of the launch operations. The YAML entry should include the name of the virtual machine and its IPv6 local link address within the Out of Band VLAN.
Here is the source code of the `build_lab_inventory.py`:
{%gist platu/1c5c5c3070da7038140007936f70fd42%}
## Step 3: Create an Ansible playbook to synthetise scripts operations.
We are now ready to pull virtual machine image, resize main partition, customize and add inventory.
In this step, we develop a playbook called `pull_customize_run.yml` that calls the scripts developed in the previous step.
{%gist platu/986366adc99e558a3bf73fd43d52e03c%}
The playbook contains 7 tasks:
DOWNLOAD DEBIAN CLOUD IMAGE QCOW2 FILE
: Use the **get_url** module to download image file from cloud.debian.org.
COPY CLOUD IMAGE TO VM IMAGE FILE FOR ALL VMS
: After pulling the reference image, we need to create a copy for each virtual machine defined in the Ansible inventory.
RESIZE VIRTUAL MACHINE FILESYSTEM
: Use the **script** module to run the `resize.sh` script on the hypervisor with the parameter list provided by the Ansible variables.
CUSTOMIZE VIRTUAL MACHINE IMAGE
: Use the **script** module to run the `customize.sh` script on the hypervisor with the parameter list provided by the Ansible variables.
The main interest of the **script** module comes from the fact that we don't have to worry about copying a script from the DevNet VM to the hypervisor before running it.
LAUNCH VIRTUAL MACHINE
: Use the **shell** module to call the `ovs-startup.sh` script which is already present on the hypervisor. The necessary directories and symlinks were set up when the `prepare.yml` playbook was run.
From this point on, the new virtual machine is active and running.
FORCE LAB INVENTORY REBUILD
: Use the **file** module to delete launch output trace and previous inventory files in the DevNet working directory to ensure that the dynamic inventory is up to date as the **fetch** module used in the next task does not provide an update facility.
FETCH LAUNCH OUTPUT MESSAGES
: Use the **fetch** module to collect launch output messages from the hypervisor to the DevNet VM. These messages are useful for creating the new inventory entry that gives Ansible access to the virtual machine.
BUILD LAB INVENTORY
: Use the **command** module to run the Python script that extracts the virtual machine name and IPv6 local link address of the virtual machine and creates the inventory entry in YAML format.
Notice the **delegate_to** option which allows to run the script on the DevNet VM itself.
## Step 4: Run the `pull_customize_run.yml` playbook
Here is a sample output of the playbook execution.
```bash
ansible-playbook pull_customize_run.yml --ask-vault-pass --extra-vars @$HOME/iac_lab01_passwd.yml
Vault password:
```
```bash=
PLAY [PULL AND CUSTOMIZE CLOUD IMAGE] *************************************
TASK [Gathering Facts] ****************************************************
ok: [bob]
TASK [DOWNLOAD DEBIAN CLOUD IMAGE QCOW2 FILE] *****************************
changed: [bob]
TASK [COPY CLOUD IMAGE TO VM IMAGE FILE FOR ALL VMS] **********************
changed: [bob] => (item=vmXXX)
changed: [bob] => (item=vmYYY)
TASK [RESIZE VIRTUAL MACHINE FILESYSTEM] **********************************
changed: [bob] => (item=vmXXX)
changed: [bob] => (item=vmYYY)
TASK [CUSTOMIZE VIRTUAL MACHINE IMAGE] ************************************
changed: [bob] => (item=vmXXX)
changed: [bob] => (item=vmYYY)
TASK [LAUNCH VIRTUAL MACHINE] *********************************************
changed: [bob] => (item=vmXXX)
changed: [bob] => (item=vmYYY)
TASK [FORCE LAB INVENTORY REBUILD] ****************************************
changed: [bob -> localhost] => (item=trace/launch_output.txt)
changed: [bob -> localhost] => (item=inventory/lab.yml)
TASK [FETCH LAUNCH OUTPUT MESSAGES] ***************************************
changed: [bob]
TASK [BUILD LAB INVENTORY] ************************************************
changed: [bob -> localhost]
PLAY RECAP ****************************************************************
bob : ok=9 changed=8 unreachable=0 failed=0 skipped=0 rescued=0 ignored=0
```
## Step 5: Check Ansible SSH access to the target virtual machines
Here we use the **ping** Ansible module directly from the command line.
```bash
ansible vms -m ping --ask-vault-pass --extra-vars @$HOME/iac_lab01_passwd.yml
Vault password:
```
> We use the **vms** group entry defined in the main inventory file set in Part 1: `hosts.yml`
```bash=
vmXXX | SUCCESS => {
"changed": false,
"ping": "pong"
}
vmYYY | SUCCESS => {
"changed": false,
"ping": "pong"
}
```
We can also check the inventory contains **vmXXX** and **vmYYY** entries with their own parameters.
```bash
ansible-inventory --yaml --list
```
```yaml=
all:
children:
hypervisors:
hosts:
bob:
ansible_host: fe80:1c::1%enp0s1
ansible_ssh_pass: '{{ hypervisor_pass }}'
ansible_ssh_port: 2222
ansible_ssh_user: '{{ hypervisor_user }}'
cloud_url: cloud.debian.org/images/cloud/trixie/daily/latest/debian-13-genericcloud-amd64-daily.qcow2
filesystem_resize: 32G
image_name: debian-13-amd64.qcow2
lab_name: iac_lab01
oob_vlan: 28
taps:
- link: vmXXX
name: tap4
switch: dsw-host
trunks:
- 0
- 28
- 230
vlan_mode: trunk
- link: vmYYY
name: tap5
switch: dsw-host
trunks:
- 0
- 28
- 230
vlan_mode: trunk
vms:
hosts:
vmXXX:
ansible_become: 'true'
ansible_become_password: '{{ vm_pass }}'
ansible_host: fe80::baad:caff:fefe:4%enp0s1
ansible_port: 2222
ansible_ssh_pass: '{{ vm_pass }}'
ansible_ssh_user: '{{ vm_user }}'
inband_vlan: 230
interfaces:
- interface_id: '{{ inband_vlan }}'
interface_type: vlan
ipv4_address: 10.0.{{ 228 + tap_number|int // 256 }}.{{ tap_number|int % 256 }}/22
ipv4_dns: 172.16.0.2
ipv4_gateway: 10.0.228.1
patches:
enp0s1: tap4
ram: 1024
tap_number: '{{ patches.enp0s1 | regex_replace(''tap'', '''') }}'
vmYYY:
ansible_become: 'true'
ansible_become_password: '{{ vm_pass }}'
ansible_host: fe80::baad:caff:fefe:5%enp0s1
ansible_port: 2222
ansible_ssh_pass: '{{ vm_pass }}'
ansible_ssh_user: '{{ vm_user }}'
inband_vlan: 230
interfaces:
- interface_id: '{{ inband_vlan }}'
interface_type: vlan
ipv4_address: 10.0.{{ 228 + tap_number|int // 256 }}.{{ tap_number|int % 256 }}/22
ipv4_dns: 172.16.0.2
ipv4_gateway: 10.0.228.1
patches:
enp0s1: tap5
ram: 1024
tap_number: '{{ patches.enp0s1 | regex_replace(''tap'', '''') }}'
```
This completes the **Infrastructure as Code** part of creating virtual machines from scratch. We can now control and configure these new virtual machines from the DevNet VM.
# Part 5: Add an In band VLAN connection to the virtual machines
Before adding any new in-band network access to our virtual machines, we analyze the current network configuration and its addresses within the out-of-band VLAN.
Then, we create another Ansible playbook to provide access to the selected in-band VLANs and their addressing plan.
## Step 1: Look at the actual network configuration
Now that we have access to our newly built virtual machines, let's examine the current network configuration. The main point here is to show that even though we can see the management addresses of the dedicated interface, **the default routing tables are empty**.
### What are the addresses assigned to the out-of-band VLAN?
We just have to list addresses with the `ip` command using the **command** ansible module on the DevNet virtual machine.
```bash
ansible vms -m command -a "ip addr ls" --ask-vault-pass --extra-vars @$HOME/iac_lab01_passwd.yml
Vault password:
```
```bash=
vmXXX | CHANGED | rc=0 >>
1: lo: <LOOPBACK,UP,LOWER_UP> mtu 65536 qdisc noqueue state UNKNOWN group default qlen 1000
link/loopback 00:00:00:00:00:00 brd 00:00:00:00:00:00
inet 127.0.0.1/8 scope host lo
valid_lft forever preferred_lft forever
inet6 ::1/128 scope host noprefixroute
valid_lft forever preferred_lft forever
2: enp0s1: <BROADCAST,MULTICAST,UP,LOWER_UP> mtu 1500 qdisc mq state UP group default qlen 1000
link/ether b8:ad:ca:fe:00:04 brd ff:ff:ff:ff:ff:ff
inet6 fe80::baad:caff:fefe:4/64 scope link proto kernel_ll
valid_lft forever preferred_lft forever
3: mgmt-vrf: <NOARP,MASTER,UP,LOWER_UP> mtu 65575 qdisc noqueue state UP group default qlen 1000
link/ether 62:55:83:00:0f:41 brd ff:ff:ff:ff:ff:ff
4: mgmt@enp0s1: <BROADCAST,MULTICAST,UP,LOWER_UP> mtu 1500 qdisc noqueue master mgmt-vrf state UP group default qlen 1000
link/ether b8:ad:ca:fe:00:04 brd ff:ff:ff:ff:ff:ff
inet 198.18.29.4/23 metric 1024 brd 198.18.29.255 scope global dynamic mgmt
valid_lft 85276sec preferred_lft 85276sec
inet6 2001:678:3fc:1c:baad:caff:fefe:4/64 scope global dynamic mngtmpaddr noprefixroute
valid_lft 85933sec preferred_lft 13933sec
inet6 fe80::baad:caff:fefe:4/64 scope link proto kernel_ll
valid_lft forever preferred_lft forever
vmYYY | CHANGED | rc=0 >>
1: lo: <LOOPBACK,UP,LOWER_UP> mtu 65536 qdisc noqueue state UNKNOWN group default qlen 1000
link/loopback 00:00:00:00:00:00 brd 00:00:00:00:00:00
inet 127.0.0.1/8 scope host lo
valid_lft forever preferred_lft forever
inet6 ::1/128 scope host noprefixroute
valid_lft forever preferred_lft forever
2: enp0s1: <BROADCAST,MULTICAST,UP,LOWER_UP> mtu 1500 qdisc mq state UP group default qlen 1000
link/ether b8:ad:ca:fe:00:05 brd ff:ff:ff:ff:ff:ff
inet6 fe80::baad:caff:fefe:5/64 scope link proto kernel_ll
valid_lft forever preferred_lft forever
3: mgmt-vrf: <NOARP,MASTER,UP,LOWER_UP> mtu 65575 qdisc noqueue state UP group default qlen 1000
link/ether 86:61:67:8a:b4:1a brd ff:ff:ff:ff:ff:ff
4: mgmt@enp0s1: <BROADCAST,MULTICAST,UP,LOWER_UP> mtu 1500 qdisc noqueue master mgmt-vrf state UP group default qlen 1000
link/ether b8:ad:ca:fe:00:05 brd ff:ff:ff:ff:ff:ff
inet 198.18.29.5/23 metric 1024 brd 198.18.29.255 scope global dynamic mgmt
valid_lft 85278sec preferred_lft 85278sec
inet6 2001:678:3fc:1c:baad:caff:fefe:5/64 scope global dynamic mngtmpaddr noprefixroute
valid_lft 85933sec preferred_lft 13933sec
inet6 fe80::baad:caff:fefe:5/64 scope link proto kernel_ll
valid_lft forever preferred_lft forever
```
- Lines starting with '2:' indicate that the main network interface `enp0s1` doesn't have any address, except a link-local IPv6 address, which is not relevant.
- Lines starting with "3:" indicate that the `mgmt-vrf` interface defines a **virtual routing and forwarding** context.
- Lines starting with '4:' indicate that the `mgmt@enp0s1` interface is the management interface used by Ansible SSH connections to manage the target virtual machines system.
The management network, also known as the out-of-band VLAN, is a separate and independent network from the target system's network configuration. This is obvious when examining the routing tables.
### What network entries are provided by the routing tables?
As with the network addresses, the `ip` command and ansible **command** module are used.
The default IPv4 routing table on the target system is empty.
```bash
ansible vms -m command -a "ip route ls" --ask-vault-pass --extra-vars @$HOME/iac_lab01_passwd.yml
Vault password:
```
```bash=
vmYYY | CHANGED | rc=0 >>
vmXXX | CHANGED | rc=0 >>
```
We get the same result with IPv6 default routing table.
```bash
ansible vms -m command -a "ip -6 route ls" --ask-vault-pass --extra-vars @$HOME/iac_lab01_passwd.yml
Vault password:
```
```bash=
vmYYY | CHANGED | rc=0 >>
fe80::/64 dev enp0s1 proto kernel metric 256 pref medium
vmXXX | CHANGED | rc=0 >>
fe80::/64 dev enp0s1 proto kernel metric 256 pref medium
```
We have to specify the VRF context to get routing tables network entries for the management out-of-band network.
```bash
ansible vms -m command -a "ip route ls vrf mgmt-vrf" --ask-vault-pass --extra-vars @$HOME/iac_lab01_passwd.yml
Vault password:
```
```bash=
vmXXX | CHANGED | rc=0 >>
default via 198.18.28.1 dev mgmt proto dhcp src 198.18.29.4 metric 1024
172.16.0.2 via 198.18.28.1 dev mgmt proto dhcp src 198.18.29.4 metric 1024
198.18.28.0/23 dev mgmt proto kernel scope link src 198.18.29.4 metric 1024
198.18.28.1 dev mgmt proto dhcp scope link src 198.18.29.4 metric 1024
vmYYY | CHANGED | rc=0 >>
default via 198.18.28.1 dev mgmt proto dhcp src 198.18.29.5 metric 1024
172.16.0.2 via 198.18.28.1 dev mgmt proto dhcp src 198.18.29.5 metric 1024
198.18.28.0/23 dev mgmt proto kernel scope link src 198.18.29.5 metric 1024
198.18.28.1 dev mgmt proto dhcp scope link src 198.18.29.5 metric 1024
```
IPv4 network configurationn is provided by DHCP.
```bash
ansible vms -m command -a "ip -6 route ls vrf mgmt-vrf" --ask-vault-pass --extra-vars @$HOME/iac_lab01_passwd.yml
Vault password:
```
```bash=
vmXXX | CHANGED | rc=0 >>
2001:678:3fc:1c::/64 dev mgmt proto ra metric 1024 expires 86131sec hoplimit 64 pref medium
fe80::/64 dev mgmt proto kernel metric 256 pref medium
multicast ff00::/8 dev mgmt proto kernel metric 256 pref medium
default via fe80::801:42ff:feb7:13ba dev mgmt proto ra metric 1024 expires 1531sec hoplimit 64 pref medium
vmYYY | CHANGED | rc=0 >>
2001:678:3fc:1c::/64 dev mgmt proto ra metric 1024 expires 86131sec hoplimit 64 pref medium
fe80::/64 dev mgmt proto kernel metric 256 pref medium
multicast ff00::/8 dev mgmt proto kernel metric 256 pref medium
default via fe80::801:42ff:feb7:13ba dev mgmt proto ra metric 1024 expires 1531sec hoplimit 64 pref medium
```
IPv6 network configuration is provided by SLAAC Router Advertisment (RA).
## Step 2: Adding a new network access to an In-Band VLAN
In the previous step, we had the confirmation that management network access is isolated in a dedicated namespace. We are now ready to add access to new in-band VLANs that will be available to the `ansible_user` for lab operations.
It's time to complete the virtual machines addressing plan and create a new network configuration playbook.
### Declare In-Band VLAN addressing
First, we need to choose among all the VLANs provided by the private cloud infrastructure. For instance, let us consider VLAN 230, which is addressed in the following manner:
- IPv4 static addressing with default gateway: 10.0.228.1/22
- IPv6 SLAAC addressing
We can print virtual machine group `vms` inventory entries as they were defined in the declarative phase of the lab design ([Part 2](#Part-2-Designing-the-Declarative-Part)).
We can recall here that **IPv4 addresses are calculated** with each virtual machine tap interface number **to avoid duplicates**.
```bash
ansible-inventory --yaml --limit vms --list
```
```yaml=
all:
children:
vms:
hosts:
vmXXX:
ansible_become: 'true'
ansible_become_password: '{{ vm_pass }}'
ansible_host: fe80::baad:caff:fefe:4%enp0s1
ansible_port: 2222
ansible_ssh_pass: '{{ vm_pass }}'
ansible_ssh_user: '{{ vm_user }}'
inband_vlan: 230
interfaces:
- interface_id: '{{ inband_vlan }}'
interface_type: vlan
ipv4_address: 10.0.{{ 228 + tap_number|int // 256 }}.{{ tap_number|int % 256 }}/22
ipv4_dns: 172.16.0.2
ipv4_gateway: 10.0.228.1
patches:
enp0s1: tap4
ram: 1024
tap_number: '{{ patches.enp0s1 | regex_replace(''tap'', '''') }}'
vmYYY:
ansible_become: 'true'
ansible_become_password: '{{ vm_pass }}'
ansible_host: fe80::baad:caff:fefe:5%enp0s1
ansible_port: 2222
ansible_ssh_pass: '{{ vm_pass }}'
ansible_ssh_user: '{{ vm_user }}'
inband_vlan: 230
interfaces:
- interface_id: '{{ inband_vlan }}'
interface_type: vlan
ipv4_address: 10.0.{{ 228 + tap_number|int // 256 }}.{{ tap_number|int % 256 }}/22
ipv4_dns: 172.16.0.2
ipv4_gateway: 10.0.228.1
patches:
enp0s1: tap5
ram: 1024
tap_number: '{{ patches.enp0s1 | regex_replace(''tap'', '''') }}'
```
### Create a playbook to set up the new network access
The tasks outlined in this new playbook called `add_vlan.yml` involve adding two new network configuration files and a VLAN entry to the main interface configuration file of the virtual machines. If necessary, reload all network interfaces.
{%gist platu/fa8c5b231c006b362cf08a25624ef8e9%}
The following Ansible modules are involved in managing network configuration files:
[ansible.builtin.stat](https://docs.ansible.com/ansible/latest/collections/ansible/builtin/stat_module.html)
: Retrieve file or file system status
In our lab context, we need to check that the netdev and network files exist before we can create or edit them. The **stat** module is used to collect the status of the files. Then we can decide if the files need to be created or not.
[ansible.builtin.copy](https://docs.ansible.com/ansible/latest/collections/ansible/builtin/copy_module.html)
: Copy files to remote locations
In our lab context, we are not actually copying files, but providing content to be copied to the virtual machine's /etc/systemd/network directory files.
This copy operation only occurs if the target files do not already exist.
[ansible.builtin.lineinfile](https://docs.ansible.com/ansible/latest/collections/ansible/builtin/lineinfile_module.html)
: Manage lines in text files
This module is used to edit files depending on the network configuration attributes provided in the YAML host variable files.
If the VLAN default gateway is declared, it will be added to the interface network file.
The same applies to the DNS resolver.
## Step3: Run the `add_vlan.yml` playbook and test the new network access
When running this playboook, we get the following output:
```bash
ansible-playbook add_vlan.yml --ask-vault-pass --extra-vars @$HOME/iac_lab01_passwd.yml
Vault password:
```
```bash=
PLAY [ADD IN BAND VLAN ACCESS] *************************************************
TASK [Gathering Facts] *********************************************************
ok: [vmYYY]
ok: [vmXXX]
TASK [CHECK IF SYSTEMD NETDEV FILE EXISTS FOR IN BAND VLAN] ********************
ok: [vmXXX] => (item={'interface_type': 'vlan', 'interface_id': 230, 'ipv4_address': '10.0.228.4/22', 'ipv4_gateway': '10.0.228.1', 'ipv4_dns': '172.16.0.2'})
ok: [vmYYY] => (item={'interface_type': 'vlan', 'interface_id': 230, 'ipv4_address': '10.0.228.5/22', 'ipv4_gateway': '10.0.228.1', 'ipv4_dns': '172.16.0.2'})
TASK [CREATE SYSTEMD NETDEV FILE FOR IN BAND VLAN] *****************************
changed: [vmYYY] => (item={'interface_type': 'vlan', 'interface_id': 230, 'ipv4_address': '10.0.228.5/22', 'ipv4_gateway': '10.0.228.1', 'ipv4_dns': '172.16.0.2'})
changed: [vmXXX] => (item={'interface_type': 'vlan', 'interface_id': 230, 'ipv4_address': '10.0.228.4/22', 'ipv4_gateway': '10.0.228.1', 'ipv4_dns': '172.16.0.2'})
TASK [CHECK IF SYSTEMD NETWORK FILE EXISTS FOR IN BAND VLAN] *******************
ok: [vmXXX] => (item={'interface_type': 'vlan', 'interface_id': 230, 'ipv4_address': '10.0.228.4/22', 'ipv4_gateway': '10.0.228.1', 'ipv4_dns': '172.16.0.2'})
ok: [vmYYY] => (item={'interface_type': 'vlan', 'interface_id': 230, 'ipv4_address': '10.0.228.5/22', 'ipv4_gateway': '10.0.228.1', 'ipv4_dns': '172.16.0.2'})
TASK [CREATE SYSTEMD NETWORK FILE FOR IN BAND VLAN] ****************************
changed: [vmXXX] => (item={'interface_type': 'vlan', 'interface_id': 230, 'ipv4_address': '10.0.228.4/22', 'ipv4_gateway': '10.0.228.1', 'ipv4_dns': '172.16.0.2'})
changed: [vmYYY] => (item={'interface_type': 'vlan', 'interface_id': 230, 'ipv4_address': '10.0.228.5/22', 'ipv4_gateway': '10.0.228.1', 'ipv4_dns': '172.16.0.2'})
TASK [UPDATE DEFAULT GATEWAY IF DEFINED] ***************************************
changed: [vmXXX] => (item={'interface_type': 'vlan', 'interface_id': 230, 'ipv4_address': '10.0.228.4/22', 'ipv4_gateway': '10.0.228.1', 'ipv4_dns': '172.16.0.2'})
changed: [vmYYY] => (item={'interface_type': 'vlan', 'interface_id': 230, 'ipv4_address': '10.0.228.5/22', 'ipv4_gateway': '10.0.228.1', 'ipv4_dns': '172.16.0.2'})
TASK [UPDATE DNS RESOLVER ADDRESS IF DEFINED] **********************************
changed: [vmYYY] => (item={'interface_type': 'vlan', 'interface_id': 230, 'ipv4_address': '10.0.228.5/22', 'ipv4_gateway': '10.0.228.1', 'ipv4_dns': '172.16.0.2'})
changed: [vmXXX] => (item={'interface_type': 'vlan', 'interface_id': 230, 'ipv4_address': '10.0.228.4/22', 'ipv4_gateway': '10.0.228.1', 'ipv4_dns': '172.16.0.2'})
TASK [UPDATE MAIN INTERFACE FILE] **********************************************
changed: [vmXXX] => (item={'interface_type': 'vlan', 'interface_id': 230, 'ipv4_address': '10.0.228.4/22', 'ipv4_gateway': '10.0.228.1', 'ipv4_dns': '172.16.0.2'})
changed: [vmYYY] => (item={'interface_type': 'vlan', 'interface_id': 230, 'ipv4_address': '10.0.228.5/22', 'ipv4_gateway': '10.0.228.1', 'ipv4_dns': '172.16.0.2'})
RUNNING HANDLER [RESTART SYSTEMD NETWORKD] *************************************
changed: [vmYYY]
changed: [vmXXX]
PLAY RECAP *********************************************************************
vmXXX : ok=9 changed=6 unreachable=0 failed=0 skipped=0 rescued=0 ignored=0
vmYYY : ok=9 changed=6 unreachable=0 failed=0 skipped=0 rescued=0 ignored=0
```
When testing the new in-band network access, we follow standard procedures:
### List IPv4 and IPv6 addresses of the new VLAN interface
```bash
ansible vms -m command -a "ip addr ls dev vlan230" --ask-vault-pass --extra-vars @$HOME/iac_lab01_passwd.yml
Vault password:
```
```bash=
vmXXX | CHANGED | rc=0 >>
5: vlan230@enp0s1: <BROADCAST,MULTICAST,UP,LOWER_UP> mtu 1500 qdisc noqueue state UP group default qlen 1000
link/ether b8:ad:ca:fe:00:04 brd ff:ff:ff:ff:ff:ff
inet 10.0.228.4/22 brd 10.0.231.255 scope global vlan230
valid_lft forever preferred_lft forever
inet6 2001:678:3fc:e6:baad:caff:fefe:4/64 scope global dynamic mngtmpaddr noprefixroute
valid_lft 2591939sec preferred_lft 604739sec
inet6 fe80::baad:caff:fefe:4/64 scope link proto kernel_ll
valid_lft forever preferred_lft forever
vmYYY | CHANGED | rc=0 >>
5: vlan230@enp0s1: <BROADCAST,MULTICAST,UP,LOWER_UP> mtu 1500 qdisc noqueue state UP group default qlen 1000
link/ether b8:ad:ca:fe:00:05 brd ff:ff:ff:ff:ff:ff
inet 10.0.228.5/22 brd 10.0.231.255 scope global vlan230
valid_lft forever preferred_lft forever
inet6 2001:678:3fc:e6:baad:caff:fefe:5/64 scope global dynamic mngtmpaddr noprefixroute
valid_lft 2591939sec preferred_lft 604739sec
inet6 fe80::baad:caff:fefe:5/64 scope link proto kernel_ll
valid_lft forever preferred_lft forever
```
### List the default IPv4 and IPv6 routing tables entries
```bash
ansible vms -m command -a "ip route ls" --ask-vault-pass --extra-vars @$HOME/iac_lab01_passwd.yml
Vault password:
```
```bash=
vmYYY | CHANGED | rc=0 >>
default via 10.0.228.1 dev vlan230 proto static
10.0.228.0/22 dev vlan230 proto kernel scope link src 10.0.228.5
vmXXX | CHANGED | rc=0 >>
default via 10.0.228.1 dev vlan230 proto static
10.0.228.0/22 dev vlan230 proto kernel scope link src 10.0.228.4
```
```bash
ansible vms -m command -a "ip -6 route ls" --ask-vault-pass --extra-vars @$HOME/iac_lab01_passwd.yml
Vault password:
```
```bash=
vmYYY | CHANGED | rc=0 >>
2001:678:3fc:e6::/64 dev vlan230 proto ra metric 512 expires 2591808sec mtu 9000 hoplimit 64 pref high
fe80::/64 dev enp0s1 proto kernel metric 256 pref medium
fe80::/64 dev vlan230 proto kernel metric 256 pref medium
default via fe80:e6::1 dev vlan230 proto ra metric 512 expires 1608sec mtu 9000 hoplimit 64 pref high
vmXXX | CHANGED | rc=0 >>
2001:678:3fc:e6::/64 dev vlan230 proto ra metric 512 expires 2591808sec mtu 9000 hoplimit 64 pref high
fe80::/64 dev enp0s1 proto kernel metric 256 pref medium
fe80::/64 dev vlan230 proto kernel metric 256 pref medium
default via fe80:e6::1 dev vlan230 proto ra metric 512 expires 1608sec mtu 9000 hoplimit 64 pref high
```
### Run ICMP tests to a public Internet address
```bash
ansible vms -m command -a "ping -c3 9.9.9.9" --ask-vault-pass --extra-vars @$HOME/iac_lab01_passwd.yml
Vault password:
```
```bash=
vmXXX | CHANGED | rc=0 >>
PING 9.9.9.9 (9.9.9.9) 56(84) bytes of data.
64 bytes from 9.9.9.9: icmp_seq=1 ttl=51 time=37.6 ms
64 bytes from 9.9.9.9: icmp_seq=2 ttl=51 time=26.5 ms
64 bytes from 9.9.9.9: icmp_seq=3 ttl=51 time=22.4 ms
--- 9.9.9.9 ping statistics ---
3 packets transmitted, 3 received, 0% packet loss, time 2004ms
rtt min/avg/max/mdev = 22.367/28.827/37.627/6.445 ms
vmYYY | CHANGED | rc=0 >>
PING 9.9.9.9 (9.9.9.9) 56(84) bytes of data.
64 bytes from 9.9.9.9: icmp_seq=1 ttl=51 time=22.6 ms
64 bytes from 9.9.9.9: icmp_seq=2 ttl=51 time=22.2 ms
64 bytes from 9.9.9.9: icmp_seq=3 ttl=51 time=22.5 ms
--- 9.9.9.9 ping statistics ---
3 packets transmitted, 3 received, 0% packet loss, time 2004ms
rtt min/avg/max/mdev = 22.206/22.455/22.614/0.178 ms
```
```bash
ansible vms -m command -a "ping -c3 2620:fe::fe" --ask-vault-pass --extra-vars @$HOME/iac_lab01_passwd.yml
Vault password:
```
```bash=
vmXXX | CHANGED | rc=0 >>
PING 2620:fe::fe (2620:fe::fe) 56 data bytes
64 bytes from 2620:fe::fe: icmp_seq=1 ttl=59 time=146 ms
64 bytes from 2620:fe::fe: icmp_seq=2 ttl=59 time=39.3 ms
64 bytes from 2620:fe::fe: icmp_seq=3 ttl=59 time=39.9 ms
--- 2620:fe::fe ping statistics ---
3 packets transmitted, 3 received, 0% packet loss, time 2003ms
rtt min/avg/max/mdev = 39.333/74.932/145.585/49.959 ms
vmYYY | CHANGED | rc=0 >>
PING 2620:fe::fe (2620:fe::fe) 56 data bytes
64 bytes from 2620:fe::fe: icmp_seq=1 ttl=59 time=259 ms
64 bytes from 2620:fe::fe: icmp_seq=2 ttl=59 time=39.8 ms
64 bytes from 2620:fe::fe: icmp_seq=3 ttl=59 time=39.5 ms
--- 2620:fe::fe ping statistics ---
3 packets transmitted, 3 received, 0% packet loss, time 2003ms
rtt min/avg/max/mdev = 39.549/112.924/259.404/103.577 ms
```
All the above ICMP and ICMPv6 tests show that there no packet loss and that packet routing is fully functional with IPv4 and IPv6.
# Part 6: Virtual machines system configuration
Last but not least, we can use the in-band VLAN network access to run a few system configuration tasks on the virtual machines.
## Step 1: Create an operating system configuration playbook
We want to tune the following operating system parts:
- Localization
- Time zone
- Package management with proper signature checks
- A bash shell alias called `ll`
Therefore, we create a `system_bits.yml` playbook file.
{%gist platu/8e966ea0efe021721c5c3ec3c443ced1 %}
Fortunately, Ansible modules such as **locale_gen** and **timezone** simplify the operations.
The most complex part of this playbook uses the **replace** module with regular expressions. The line `Signed-By: /usr/share/keyrings/debian-archive-keyring.gpg`must be added after each `Components: main` of the `/etc/apt/sources.list.d/debian.sources` only if it's not already there.
Finally, the **lineinfile** module is called to create a `$HOME/.bash_aliases` file for the `ansible_user` account with the correct attributes.
## Step 2: Run the `system_bits.yml` playbook
```bash
ansible-playbook system_bits.yml --ask-vault-pass --extra-vars @$HOME/iac_lab01_passwd.yml
Vault password:
```
```bash=
PLAY [CONFIGURE SYSTEM BITS AND PIECES] ****************************************
TASK [Gathering Facts] *********************************************************
ok: [vmYYY]
ok: [vmXXX]
TASK [CONFIGURE VM LOCALES] ****************************************************
changed: [vmYYY]
changed: [vmXXX]
TASK [CONFIGURE VM TIMEZONE] ***************************************************
changed: [vmXXX]
changed: [vmYYY]
TASK [INSTALL DEBIAN KEYRING] **************************************************
changed: [vmYYY]
changed: [vmXXX]
TASK [UPDATE DEBIAN SOURCES] ***************************************************
changed: [vmXXX]
changed: [vmYYY]
TASK [ADD LL BASH ALIAS] *******************************************************
changed: [vmXXX]
changed: [vmYYY]
PLAY RECAP *********************************************************************
vmXXX : ok=6 changed=5 unreachable=0 failed=0 skipped=0 rescued=0 ignored=0
vmYYY : ok=6 changed=5 unreachable=0 failed=0 skipped=0 rescued=0 ignored=0
```
This lab concludes with the final configuration step. At this point, we are prepared to initiate new automated networking manipulations.