# IaC Lab 3 -- Using GitLab CI to run Ansible playbooks an build new IOS XE Virtual Routers
[toc]
---
> Copyright (c) 2024 Philippe Latu.
Permission is granted to copy, distribute and/or modify this document under the
terms of the GNU Free Documentation License, Version 1.3 or any later version
published by the Free Software Foundation; with no Invariant Sections, no
Front-Cover Texts, and no Back-Cover Texts. A copy of the license is included
in the section entitled "GNU Free Documentation License".
GitLab repository: https://gitlab.inetdoc.net/iac/lab03
## Background / Scenario
This is the third lab in the sequence. The first lab ([Lab 1](https://md.inetdoc.net/s/f-mfjs-kQ)) focused on automation by presenting the design of the declarative and procedural parts needed to build new Debian GNU/Linux virtual machines from the cloud.debian.org source. The second lab ([Lab 2](https://md.inetdoc.net/s/CPltj12uT)) introduced GitLab continuous integration (CI) by setting up a new session between the GitLab web service and a runner that executes the tasks from the first lab in a pipeline.
In this third lab we keep the design decisions made in the first lab. We continue to use the GitLab CI pipeline with the same stages as in the second lab. What's new is replacing of Linux virtual machines with Cisco IOS-XE routers with a different set of network interfaces.
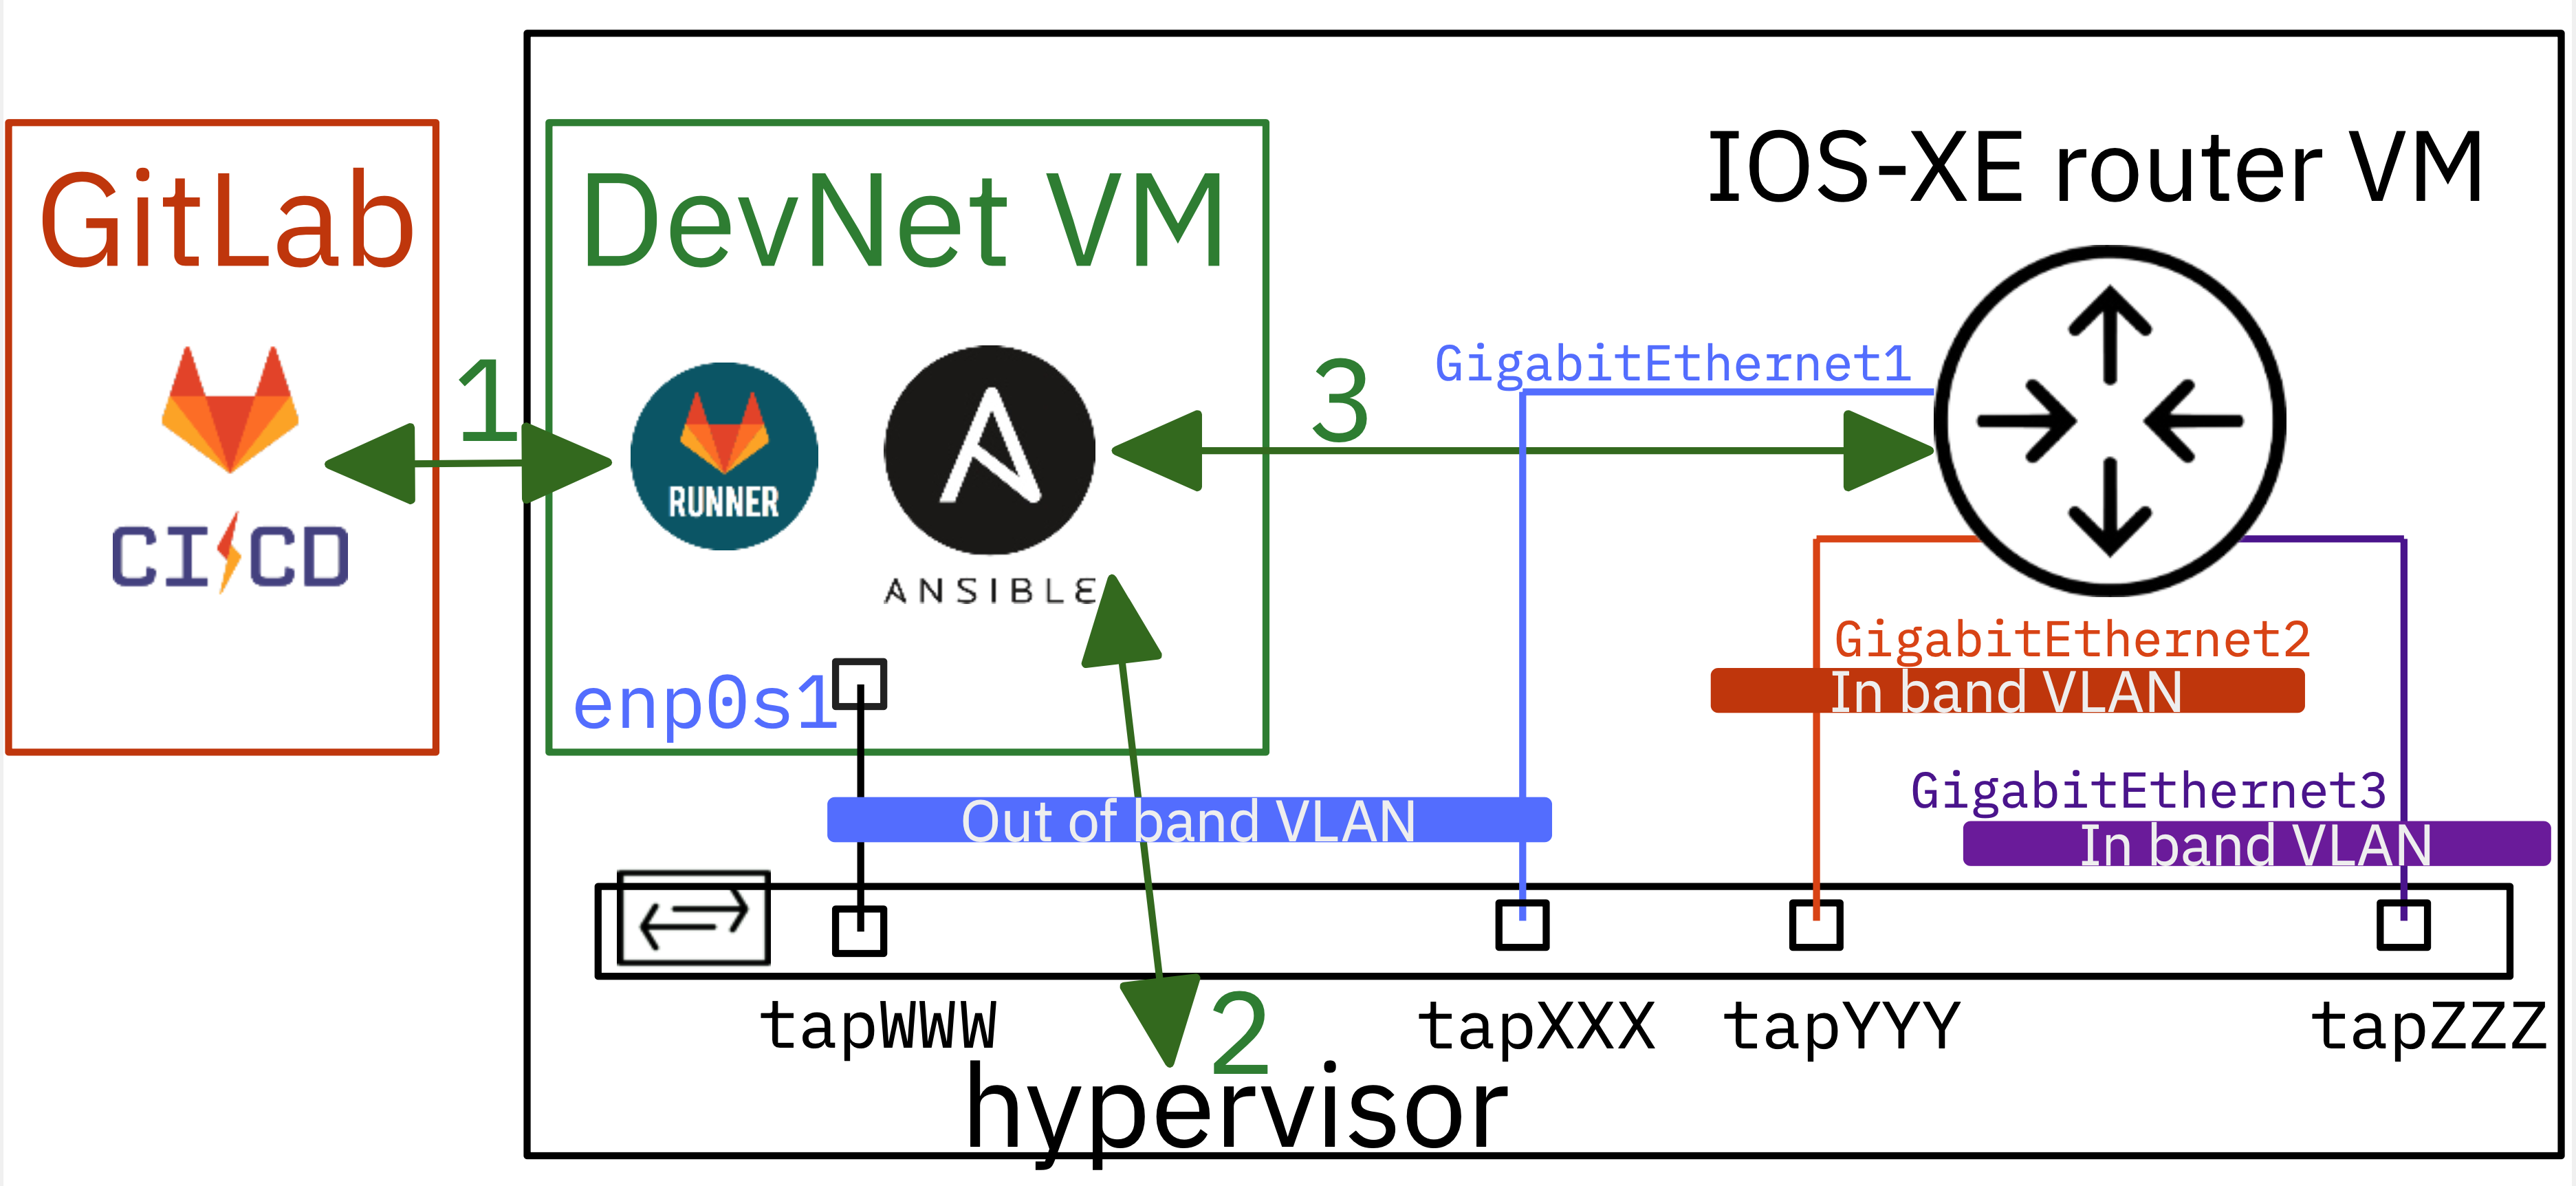
The division between an Out of Band VLAN for management and automation traffic and In Band VLANs for user traffic remains the same.
The virtual router configuration was chosen to use three network interfaces because the physical routers available in the real lab room are ISR4321, which have three interfaces.
Unfortunately, there is a difference between the physical router, where the management network interface is isolated from user traffic at the chip level, and the virtual router, where the use of a management interface is a configuration choice. This is a source of confusion for students. They often try to configure this dedicated management interface as a user interface.
To address this issue, both physical and virtual routers are deployed using Zero Touch Programming ([ZTP](https://github.com/jeremycohoe/IOSXE-Zero-Touch-Provisioning)). The Python script run on initial startup of both types of router ensures that the management interface belongs to a Virtual Routing and Forwarding (VRF) that is isolated from other In Band interfaces.
We are now ready to begin this third lab with the following scenario: hypervisor-level preparation with the startup of two new virtual router instances and the configuration of an In Band interface on each router within the same VLAN.
## Design decisions reminder
The purpose of this lab series is to maintain consistent design decisions when virtualizing Linux systems, Cisco IOS-XE routers, or Cisco NX-OS switches. So, as in [Lab 1](https://md.inetdoc.net/s/f-mfjs-kQ#Part-2-Designing-the-Declarative-Part), we start with the bare-metal Type 2 hypervisor, which owns all the tap network interfaces.
The tap interfaces connect virtualized systems to an Open vSwitch switch named dsw-host. The preparation stage ensures that the switch ports configuration conforms to the **underlay network**.
:arrow_right: The hypervisor `host_vars` file `bob.yml` contains all tap interfaces configuration declarations.
The configurations of the routers' interfaces are declared in each virtualized system's `host_vars` file. This is the declarative part of the **overlay network**.
:arrow_right: The inventory of virtualized systems is dynamically built upon launch.
# Part 1: Configuration setup for Ansible on the DevNet VM
To begin, it is necessary to configure Ansible and verify SSH access to the hypervisor from the DevNet VM.
## Step 1: Create the Ansible directory and configuration file
1. Make the `~/iac/lab03` directory for example and navigate to this folder
```bash
mkdir -p ~/iac/lab03 && cd ~/iac/lab03
```
2. Check that **ansible** is installed
There are two main ways to set up a new Ansible workspace. Packages and Python virtual environments are both viable options. Both methods have their advantages and disadvantages.
- If we wish to use the Ansible package provided by the Linux distribution, the tool will be immediately available. However, difficulties may arise with modules that are not up to date or aligned with Python repositories. With an Ubuntu distribution, the package information is as follows:
```bash
command -v ansible
/usr/bin/ansible
ansible --version
```
```bash=
ansible [core 2.16.3]
config file = /home/etu/iac/lab03/ansible.cfg
configured module search path = ['/home/etu/.ansible/plugins/modules', '/usr/share/ansible/plugins/modules']
ansible python module location = /usr/lib/python3/dist-packages/ansible
ansible collection location = /home/etu/.ansible/collections:/usr/share/ansible/collections
executable location = /usr/bin/ansible
python version = 3.12.2 (main, Feb 7 2024, 20:47:03) [GCC 13.2.0] (/usr/bin/python3)
jinja version = 3.1.2
libyaml = True
```
- To utilize the latest versions of tools in Python, we can create a virtual environment by following these steps:
Still with an Ubuntu distribution:
```bash=
cat << EOF > requirements.txt
ansible
ansible-lint
ansible-pylibssh
EOF
```
```bash=
python3 -m venv ansible
source ./ansible/bin/activate
pip3 install -r requirements.txt
```
```bash
command -v ansible
/home/etu/iac/lab03/ansible/bin/ansible
ansible --version
```
```bash=
ansible [core 2.16.4]
config file = /home/etu/iac/lab03/ansible.cfg
configured module search path = ['/home/etu/.ansible/plugins/modules', '/usr/share/ansible/plugins/modules']
ansible python module location = /home/etu/iac/lab03/ansible/lib/python3.12/site-packages/ansible
ansible collection location = /home/etu/.ansible/collections:/usr/share/ansible/collections
executable location = /home/etu/iac/lab03/ansible/bin/ansible
python version = 3.12.2 (main, Feb 7 2024, 20:47:03) [GCC 13.2.0] (/home/etu/iac/lab03/ansible/bin/python3)
jinja version = 3.1.3
libyaml = True
```
3. Create a new `ansible.cfg` file in the `lab03` directory from the shell prompt
{%gist platu/f3e20a67961f5497ff2a9cf464fe4f90 %}
> Note that the inventory entry refers to the inventory directory in the default section. The plugins listed in the inventory section enable the creation of a dynamic inventory by merging all files in the directory.
## Step 2: Check SSH access to the Hypervisor from the DevNet VM
At this stage, we need to verify if we can establish an SSH connection to the Hypervisor using our user identity and the correct address.
```bash
ssh -p 2222 etudianttest@fe80:1c::1%enp0s1
```
```bash=
Linux bob 6.6.15-amd64 #1 SMP PREEMPT_DYNAMIC Debian 6.6.15-2 (2024-02-04) x86_64
The programs included with the Debian GNU/Linux system are free software;
the exact distribution terms for each program are described in the
individual files in /usr/share/doc/*/copyright.
Debian GNU/Linux comes with ABSOLUTELY NO WARRANTY, to the extent
permitted by applicable law.
-----
_ _
\ /|_ _ . _ |_) _ |_ )
\/\/ | |(_) |_> |_)(_)|_) o
Generally, Alice and Bob want to exchange a message or cryptographic key.
https://en.wikipedia.org/wiki/Alice_and_Bob
-----
```
The SSH connection parameters will be used to complete the inventory hosts file later.
## Step 3: Create a new vault file
Back to the DevNet VM console, create a new vault file called `iac_lab03_passwd.yml` and enter the unique vault password which will be used for all users passwords to be stored.
```bash
ansible-vault create $HOME/iac_lab03_passwd.yml
```
```bash=
New Vault password:
Confirm New Vault password:
```
This will open the default editor which is defined by the `$EDITOR` environment variable.
There we enter a variable name which will designate the password for Web server VM user account.
```bash
hypervisor_user: XXXXXXXXXX
hypervisor_pass: YYYYYYYYYY
vm_user: etu
vm_pass: ZZZZZZZZZ
```
As we plan to integrate the Ansible playbooks of this lab into GitLab CI pipelines, we need to store the vault secret in a file and make it available to any Ansible command that follows.
- Firstly, we store the vault secret into a file at the user home directory level
```bash
echo "ThisVaultSecret" >$HOME/.vault.passwd
chmod 600 $HOME/.vault.passwd
```
- Secondly, we ensure that the `ANSIBLE_VAULT_PASSWORD_FILE` variable is set every time a new shell is opened.
```bash
touch $HOME/.profile
echo "export ANSIBLE_VAULT_PASSWORD_FILE=\$HOME/.vault.passwd" |\
sudo tee -a $HOME/.profile
```
# Part 2: Preparation stage executed on the Hypervisor
To build and launch virtual routers, the first step is to prepare directories and obtain access to virtual router images and launch scripts. Afterward, it is necessary to verify that all switch ports to which a virtual router will be connected are configured according to the declarative YAML file.
## Step 1: The inventory directory and its content
As previously mentioned, it is crucial to distinguish between the inventory directory and the host variables directory when using Ansible.
We can start by creating the `inventory` and `host_vars` directories
```bash
mkdir ~/iac/lab03/{inventory,host_vars}
```
The inventory directory files contain the necessary information, such as host names, groups, and attributes, required to establish network connections with these hosts. Here is a copy of the `inventory/hosts.yml` file.
{%gist platu/d74587bf93d6e0b9d10a8409d25c4287 %}
The YAML description above contains two groups: **hypervisors** and **routers**. Within the hypervisors group, Bob is currently the only member present with the necessary SSH network connection parameters.
The routers group comprises two members, namely **rXXX** and **rYYY**. At this stage, we do not know much except for the fact that we are going to instantiate two virtual routers.
The SSH network connection parameters for all virtual routers will be provided after they are started and the dynamic inventory Python script is executed.
## Step 2: The host_vars directory and its content
The content of the host_vars directory will now be examined.
YAML description files for each host of the lab infrastructure can be found there.
Here are copies of:
- `host_vars/bob.yml`
- `host_vars/rXXX.yml`
- `host_vars/rYYY.yml`
:warning: Be sure to edit this inventory file and replace the **XXX** and **YYY** placeholders with the corresponding real names.
{%gist platu/a8242cd7869ead586e6bc7a355d32883 %}
The hypervisor YAML file `bob.yml` contains a list of tap interfaces to be configured, as specified in the design. The configuration parameters for each tap interface listed include the switch name, access mode port, and the tag or identifier of the connected VLAN.
Other parameters relate to the image source that is common to all virtual routerss in this lab.
The YAML files for virtual routers reference the hypervisor tap interface connection and contain the network interface **In Band** VLAN configuration parameters.
## Step 3: The Ansible configuration and Hypervisor access test
Now, we are able to use the `ping` ansible module to commincate with the `bob` entry defined in the inventory file.
```bash
ansible bob -m ping --extra-vars @$HOME/iac_lab03_passwd.yml
Vault password:
```
```bash=
bob | SUCCESS => {
"changed": false,
"ping": "pong"
}
```
As the ansible ping is successful, we can go on with playbooks to build new virtual machines.
## Step 4: The prepare stage playbook
Here is a copy of the `prepare.yml` Ansible Playbook, which includes two categories of procedures.
- In the initial phase, the tasks ensure that all the required directories and symlinks are in place in the user's home directory to run a virtual machine.
These operations are familiar to all students as they are provided at the top of each Moodle course page as shell instructions.
- In the second phase, the configuration of the tap switch ports is adjusted to match the attributes specified in the YAML file. In this particular lab context, each switch port is configured in **access mode** and belongs to the VLAN defined in the YAML file.
The playbook is designed for reusability and includes instructions for configuring switch ports in either access or trunk mode.
{%gist platu/f6fa79855e21e5c1f50c50d1282f2b3d %}
The playbook uses two Ansible modules: **file** and **shell**.
- [ansible.builtin.file module](https://docs.ansible.com/ansible/latest/collections/ansible/builtin/file_module.html) manages all types of files and their properties
- [ansible.builtin.shell module](https://docs.ansible.com/ansible/latest/collections/ansible/builtin/shell_module.html) executes shell commands on target hosts.
The most interesting aspects of the shell tasks are:
- Using messages sent to standard output to determine whether or not a configuration change has occurred. Look for the `changed_when:` keyword in the playbook code.
- Using item attributes to know whether or not to run a task. Look for the `when:` keyword in the playbook code.
- Using item attributes to also know if a task has failed or not. Look for the `failed_when:` keyword in the same code.
When we run the playbook, we get the following output.
```bash
ansible-playbook prepare.yml --extra-vars @$HOME/iac_lab03_passwd.yml
Vault password:
```
```bash
PLAY [PREPARE LAB ENVIRONMENT] *************************************************
TASK [Gathering Facts] *********************************************************
ok: [bob]
TASK [ENSURE SYMLINK TO MASTERS DIRECTORY EXISTS] ******************************
ok: [bob]
TASK [ENSURE VM DIRECTORY EXISTS] **********************************************
ok: [bob]
TASK [ENSURE SYMLINK TO SCRIPTS DIRECTORY EXISTS] ******************************
ok: [bob]
TASK [ENSURE LAB DIRECTORY EXISTS] *********************************************
ok: [bob]
TASK [CHECK IF TAP INTERFACES ARE ALREADY USED BY ANOTHER USER] ****************
ok: [bob] => (item={'name': 'tapXX3', 'vlan_mode': 'access', 'tag': 28, 'link': 'rXXX_mgmt', 'switch': 'dsw-host'})
ok: [bob] => (item={'name': 'tapXX4', 'vlan_mode': 'access', 'tag': 230, 'link': 'rXXX_G1', 'switch': 'dsw-host'})
ok: [bob] => (item={'name': 'tapXX5', 'vlan_mode': 'access', 'tag': 999, 'link': 'rXXX_G2', 'switch': 'dsw-host'})
ok: [bob] => (item={'name': 'tapYY6', 'vlan_mode': 'access', 'tag': 28, 'link': 'rYYY_mgmt', 'switch': 'dsw-host'})
ok: [bob] => (item={'name': 'tapYY7', 'vlan_mode': 'access', 'tag': 230, 'link': 'rYYY_G1', 'switch': 'dsw-host'})
ok: [bob] => (item={'name': 'tapYY8', 'vlan_mode': 'access', 'tag': 999, 'link': 'rYYY_G2', 'switch': 'dsw-host'})
TASK [CONFIGURE TAP INTERFACES SWITCH CONNECTION] ******************************
ok: [bob] => (item={'name': 'tapXX3', 'vlan_mode': 'access', 'tag': 28, 'link': 'rXXX_mgmt', 'switch': 'dsw-host'})
ok: [bob] => (item={'name': 'tapXX4', 'vlan_mode': 'access', 'tag': 230, 'link': 'rXXX_G1', 'switch': 'dsw-host'})
ok: [bob] => (item={'name': 'tapXX5', 'vlan_mode': 'access', 'tag': 999, 'link': 'rXXX_G2', 'switch': 'dsw-host'})
ok: [bob] => (item={'name': 'tapYY6', 'vlan_mode': 'access', 'tag': 28, 'link': 'rYYY_mgmt', 'switch': 'dsw-host'})
ok: [bob] => (item={'name': 'tapYY7', 'vlan_mode': 'access', 'tag': 230, 'link': 'rYYY_G1', 'switch': 'dsw-host'})
ok: [bob] => (item={'name': 'tapYY8', 'vlan_mode': 'access', 'tag': 999, 'link': 'rYYY_G2', 'switch': 'dsw-host'})
TASK [CONFIGURE TAP INTERFACES IN ACCESS MODE] *********************************
ok: [bob] => (item={'name': 'tapXX3', 'vlan_mode': 'access', 'tag': 28, 'link': 'rXXX_mgmt', 'switch': 'dsw-host'})
ok: [bob] => (item={'name': 'tapXX4', 'vlan_mode': 'access', 'tag': 230, 'link': 'rXXX_G1', 'switch': 'dsw-host'})
ok: [bob] => (item={'name': 'tapXX5', 'vlan_mode': 'access', 'tag': 999, 'link': 'rXXX_G2', 'switch': 'dsw-host'})
ok: [bob] => (item={'name': 'tapYY6', 'vlan_mode': 'access', 'tag': 28, 'link': 'rYYY_mgmt', 'switch': 'dsw-host'})
ok: [bob] => (item={'name': 'tapYY7', 'vlan_mode': 'access', 'tag': 230, 'link': 'rYYY_G1', 'switch': 'dsw-host'})
ok: [bob] => (item={'name': 'tapYY8', 'vlan_mode': 'access', 'tag': 999, 'link': 'rYYY_G2', 'switch': 'dsw-host'})
TASK [CONFIGURE TAP INTERFACES IN TRUNK MODE] **********************************
skipping: [bob] => (item={'name': 'tapXX3', 'vlan_mode': 'access', 'tag': 28, 'link': 'rXXX_mgmt', 'switch': 'dsw-host'})
skipping: [bob] => (item={'name': 'tapXX4', 'vlan_mode': 'access', 'tag': 230, 'link': 'rXXX_G1', 'switch': 'dsw-host'})
skipping: [bob] => (item={'name': 'tapXX5', 'vlan_mode': 'access', 'tag': 999, 'link': 'rXXX_G2', 'switch': 'dsw-host'})
skipping: [bob] => (item={'name': 'tapYY6', 'vlan_mode': 'access', 'tag': 28, 'link': 'rYYY_mgmt', 'switch': 'dsw-host'})
skipping: [bob] => (item={'name': 'tapYY7', 'vlan_mode': 'access', 'tag': 230, 'link': 'rYYY_G1', 'switch': 'dsw-host'})
skipping: [bob] => (item={'name': 'tapYY8', 'vlan_mode': 'access', 'tag': 999, 'link': 'rYYY_G2', 'switch': 'dsw-host'})
skipping: [bob]
PLAY RECAP *********************************************************************
bob : ok=8 changed=0 unreachable=0 failed=0 skipped=1 rescued=0 ignored=0
```
The master image files for the virtual routers are now ready to be copied and the virtual routers can be launched with their respective network interface parameters.
# Part 3: Launch stage executed on the Hypervisor
During this step, we will create a playbook named `copy_run.yml` that will handle the virtual router images, launch them, and execute the Python script that finalises the dynamic inventory.
At the end of this process, two virtual routers are now operational and ready for configuration through other Ansible playbooks.
## Step 1: Create a `copy_run.yml` Ansible playbook
Here is a copy of the `copy_run.yml` playbook.
{%gist platu/5d8898ff4e0b63c834d6b41695318415 %}
The playbook contains many *atomic* tasks:
COPY MASTER IMAGE FILES TO LAB DIRECTORY
: With virtual routers, it is not possible to retrieve image files from a public cloud source. The image files from the 'masters' directory, which are already available on the Hypervisor, need to be copied.
CHECK IF ROUTER IMAGE FILE EXISTS
: A router image copy can only occur if there is no existing image file in the lab directory. To make a decision on whether to copy or not, we must first determine the status (**stat** ansible module) of the router image files.
COPY QCOW2 MASTER IMAGE FILE TO ROUTER IMAGE FILE
: Copy the main filesystem image of the router only if it does not already exist. Once the routers are operational, their respective file systems change as they are configured and services are activated. File checksums cannot be relied upon to determine whether a copy should be made or not.
CHECK IF ROUTER OVMF VARS FILE EXISTS
: After checking the main filesystem image files, it is time to verify the existence of UEFI signature variable files.
COPY MASTER OVMF VARS FILE TO ROUTER OVMF VARS FILE
: By determining the status of the router's UEFI variable files, we can determine whether a new copy is necessary or not.
LAUNCH ROUTERS
: This is a crucial task in the playbook as it initiates the virtual routers using the updated image files. Once again, the launch operation will only occur if there are no routers already running. The Ansible **shell** module is used in this task to create trace files during launch. These files are used as indicators to determine whether a router is already running or not.
FORCE LAB INVENTORY REBUILD
: This task removes previously collected and written files to ensure that the Python dynamic inventory script runs on the most recent launch parameters of virtual routers.
FETCH LAUNCH OUTPUT MESSAGES
: Use the **fetch** module to collect launch output messages from the hypervisor to the DevNet VM. These messages are useful for creating the new inventory entry that gives Ansible access to the virtual machine.
BUILD LAB INVENTORY
: Use the **command** module to run the Python script that extracts the virtual machine name and IPv6 local link address of the virtual machine and creates the inventory entry in YAML format.
Notice the **delegate_to** option which allows to run the script on the DevNet VM itself.
## Step 2: Create the `build_lab_inventory.py` Python script
Here is a copy of the Python script:
{%gist platu/8ebef8c169d7f7eab5f678236cefc7fd %}
After executing the script, a new file is generated in the inventory directory. Here is an example:
```yaml=
routers:
hosts:
rXXX:
ansible_host: fe80::faad:caff:fefe:3%enp0s1
ansible_port: 2222
rYYY:
ansible_host: fe80::faad:caff:fefe:6%enp0s1
ansible_port: 2222
vars:
ansible_ssh_user: '{{ vm_user }}'
ansible_ssh_pass: '{{ vm_pass }}'
ansible_connection: network_cli
ansible_network_os: ios
```
## Step 3: Run the `copy_run.yml` Ansible playbook
Here is an example of the playbook execution.
```bash
ansible-playbook copy_run.yml --extra-vars @$HOME/iac_lab03_passwd.yml
```
```bash=
PLAY [COPY MASTER IMAGE AND RUN ROUTERS] ***************************************
TASK [Gathering Facts] *********************************************************
ok: [bob]
TASK [COPY MASTER IMAGE TO LAB DIRECTORY] **************************************
ok: [bob] => (item=/home/etudianttest/masters/c8000v-universalk9.17.13.01a.qcow2)
ok: [bob] => (item=/home/etudianttest/masters/c8000v-universalk9.17.13.01a.qcow2_OVMF_VARS.fd)
TASK [CHECK IF ROUTER IMAGE FILE EXISTS] ***************************************
ok: [bob] => (item=rXXX)
ok: [bob] => (item=rYYY)
TASK [COPY QCOW2 MASTER IMAGE FILE TO ROUTER IMAGE FILE] ***********************
skipping: [bob] => (item=rXXX)
skipping: [bob] => (item=rYYY)
skipping: [bob]
TASK [CHECK IF ROUTER OVMF VARS FILE EXISTS] ***********************************
ok: [bob] => (item=rXXX)
ok: [bob] => (item=rYYY)
TASK [COPY MASTER OVMF VARS FILE TO ROUTER OVMF VARS FILE] *********************
skipping: [bob] => (item=rXXX)
skipping: [bob] => (item=rYYY)
skipping: [bob]
TASK [LAUNCH ROUTERS] **********************************************************
ok: [bob] => (item=rXXX)
ok: [bob] => (item=rYYY)
TASK [FORCE LAB INVENTORY REBUILD] *********************************************
ok: [bob -> localhost] => (item=trace/launch_output.txt)
ok: [bob -> localhost] => (item=inventory/lab.yml)
TASK [FETCH LAUNCH OUTPUT MESSAGES] ********************************************
changed: [bob]
TASK [BUILD LAB INVENTORY] *****************************************************
changed: [bob -> localhost]
PLAY RECAP *********************************************************************
bob : ok=8 changed=2 unreachable=0 failed=0 skipped=2 rescued=0 ignored=0
```
## Step 4: Check Ansible SSH access to the target virtual routers
Here we use the **ping** Ansible module directly from the command line.
```bash
ansible routers -m ping --extra-vars @$HOME/iac_lab03_passwd.yml
```
```bash=
rYYY | SUCCESS => {
"changed": false,
"ping": "pong"
}
rXXX | SUCCESS => {
"changed": false,
"ping": "pong"
}
```
We can also check the inventory contains **rXXX** and **rYYY** entries with their own parameters.
```bash
ansible-inventory --yaml --limit routers --list
```
```yaml=
all:
children:
routers:
hosts:
rXXX:
ansible_connection: network_cli
ansible_host: fe80::faad:caff:fefe:3%enp0s1
ansible_network_os: ios
ansible_port: 2222
ansible_ssh_pass: '{{ vm_pass }}'
ansible_ssh_user: '{{ vm_user }}'
default_routes:
ipv4_next_hop: 10.0.228.1
ipv6_next_hop: 2001:678:3fc:e6::1
interfaces:
- description: --> VLAN 230
enabled: true
interface_id: 2
interface_type: GigabitEthernet
ipv4_address: 10.0.228.3/22
ipv6_address: 2001:678:3fc:e6::3/64
- description: --> VLAN 999
enabled: false
interface_id: 3
interface_type: GigabitEthernet
patches:
g2: tapXX4
g3: tapXX5
mgmt: tapXX3
rYYY:
ansible_connection: network_cli
ansible_host: fe80::faad:caff:fefe:6%enp0s1
ansible_network_os: ios
ansible_port: 2222
ansible_ssh_pass: '{{ vm_pass }}'
ansible_ssh_user: '{{ vm_user }}'
default_routes:
ipv4_next_hop: 10.0.228.1
ipv6_next_hop: 2001:678:3fc:e6::1
interfaces:
- description: --> VLAN 230
enabled: true
interface_id: 2
interface_type: GigabitEthernet
ipv4_address: 10.0.228.6/22
ipv6_address: 2001:678:3fc:e6::6/64
- description: --> VLAN 999
enabled: false
interface_id: 3
interface_type: GigabitEthernet
patches:
g2: tapYY7
g3: tapYY8
mgmt: tapYY6
```
# Part 4: Virtual routers configuration
We have now reached the stage of configuring overlay networking. Here we create a new Ansible playbook with the purpose of configuring virtual router network interfaces and testing Internet access through ICMP requests.
## Step 1: Create the `routers_config.yml` playbook
All elements used in this playbook are taken from the variables defined in the `rXXX.yml` and `rYYY.yml` files stored in the `host_vars` directory. They are used to translate the declarative desired state of the network topology via the playbook procedure.
{%gist platu/7ee29ec4174484e41cbca694bc680d3e %}
The playbook for configuring overlay networks only includes tasks that call Cisco Ansible modules.
APPLY HOSTNAME
: The router hostname is set directly from the inventory hostname using the dedicated module.
APPLY INTERFACES BASE CONFIGURATION
: The **ios_interface** module operate at the physical and link layers of the OSI model. The interface can be enabled or disabled using this. When a GigabitEthernet interface is enabled, its `line` and `protocol` indicators are active. No traffic can flow through a disabled interface.
APPLY INTERFACES L3 CONFIGURATION
: The **ios_l3_interfaces** module operate at the network layer of the model. This module sets the IPv4 and/or IPv6 addresses for an interface.
APPLY DEFAULT ROUTES
: The **static_routes** module is used here to set the IPv4 and IPv6 default routes to reach the Internet.
CHECK IPV4 AND IPV6 DEFAULT ROUTE
: The **ios_ping** module allows to check the Internet is reachable through IPv4 an dIPv6 pings.
## Step 2: Run the `routers_config.yml` playbook
Here is a sample of the playbook execution that illustrates the use of network interfaces variables for each router of the network topology.
```bash=
PLAY [CONFIGURE ROUTER INTERFACES AND DEFAULT ROUTES] **************************
TASK [Gathering Facts] *********************************************************
ok: [rXXX]
ok: [rYYY]
TASK [APPLY HOSTNAME] **********************************************************
ok: [rYYY]
ok: [rXXX]
TASK [APPLY INTERFACES BASE CONFIGURATION] *************************************
ok: [rXXX] => (item={'interface_type': 'GigabitEthernet', 'interface_id': 2, 'description': '--> VLAN 230', 'enabled': True, 'ipv4_address': '10.0.228.3/22', 'ipv6_address': '2001:678:3fc:e6::3/64'})
ok: [rYYY] => (item={'interface_type': 'GigabitEthernet', 'interface_id': 2, 'description': '--> VLAN 230', 'enabled': True, 'ipv4_address': '10.0.228.6/22', 'ipv6_address': '2001:678:3fc:e6::6/64'})
ok: [rYYY] => (item={'interface_type': 'GigabitEthernet', 'interface_id': 3, 'description': '--> VLAN 999', 'enabled': False})
ok: [rXXX] => (item={'interface_type': 'GigabitEthernet', 'interface_id': 3, 'description': '--> VLAN 999', 'enabled': False})
TASK [APPLY INTERFACES L3 CONFIGURATION] ***************************************
ok: [rYYY] => (item={'interface_type': 'GigabitEthernet', 'interface_id': 2, 'description': '--> VLAN 230', 'enabled': True, 'ipv4_address': '10.0.228.6/22', 'ipv6_address': '2001:678:3fc:e6::6/64'})
skipping: [rYYY] => (item={'interface_type': 'GigabitEthernet', 'interface_id': 3, 'description': '--> VLAN 999', 'enabled': False})
ok: [rXXX] => (item={'interface_type': 'GigabitEthernet', 'interface_id': 2, 'description': '--> VLAN 230', 'enabled': True, 'ipv4_address': '10.0.228.3/22', 'ipv6_address': '2001:678:3fc:e6::3/64'})
skipping: [rXXX] => (item={'interface_type': 'GigabitEthernet', 'interface_id': 3, 'description': '--> VLAN 999', 'enabled': False})
TASK [APPLY DEFAULT ROUTES] ****************************************************
changed: [rYYY]
changed: [rXXX]
TASK [CHECK IPV4 AND IPV6 DEFAULT ROUTE] ***************************************
ok: [rXXX] => (item={'dest': '9.9.9.9', 'afi': 'ip'})
ok: [rYYY] => (item={'dest': '9.9.9.9', 'afi': 'ip'})
ok: [rXXX] => (item={'dest': '2620:fe::fe', 'afi': 'ipv6'})
ok: [rYYY] => (item={'dest': '2620:fe::fe', 'afi': 'ipv6'})
PLAY RECAP *********************************************************************
rXXX : ok=6 changed=1 unreachable=0 failed=0 skipped=0 rescued=0 ignored=0
rYYY : ok=6 changed=1 unreachable=0 failed=0 skipped=0 rescued=0 ignored=0
```
# Part 5: Continuous integration with GitLab CI
When we arrive at this final part of the lab, it's time to gather all the Ansible playbooks into a GitLab continuous integration (CI) pipeline.
This pipeline leads to the GitOps way of working with IDE tools like Visual Studio Code. Each time a file is edited, committed and pushed to the Git repository, a new GitLab pipeline is automatically launched and the whole process is evaluated.
## Step 1: Create the `.gitlab-ci.yml` pipeline file
Here is a copy of the `.gitlab-ci.yml` file with the 5 stages described below:
{%gist platu/db43d801af6ee63da7e704cbf309f8a4 %}
1. The **Build** stage
In this particular context, the first choice was to use a shell executor runner, as presented in [Lab 2](https://md.inetdoc.net/s/CPltj12uT). The second choice made here is to use a version of Ansible that is pulled into a Python virtual environment.
For this reason, the GitLab CI file includes a build stage whose role is to set up the tools. The script run is a one-liner that sets up the Python environment according to the list of tools provided in the `requirements.txt` file in the Git repository.
2. The **Ping** stage
Since it is pointless to try to proceed if the hypervisor is unreachable, we run an ad hoc Ansible command to test access to the hypervisor.
The **needs** keyword sets a dependency relationship between the **Build** and **Ping** stages. The ansible command must be available to test hypervisor accessibility.
3. The **Prepare** stage
This stage simply runs the `prepare.yml` Ansible playbook.
4. The **CopyRun** stage
Just as in the previous stage, an Ansible playbook is run: `copy_run.yml`.
Note that the `lab.yml` inventory file, which is the result of a Python script, must be preserved for the next stages. Therfore, the inventory path is added to the **artifacts** t
5. The **Configure** stage
As mentioned earlier, this is the configuration stage of the overlay network. This can be seen as the starting point for a new routing network lab.
At this stage, the virtual routers are up and running, ready to accept user traffic. The `routers_config.yml` playbook is a minimal configuration test of an in-band network.
The last point to mention about this GitLab pipeline is that the contents of the two directories containing the Python tools are cached between the different stages. The **cache** section at the top of the `.gitlab-ci.yml` gives the directory list.
## Step 2: View the results of the continuous integration pipeline
Here is a screenshot of the CI pipeline with the dependencies between the 5 stages.

Each stage is associated with a job, the results of which can be viewed individually. Here is an example.

Inventory artifacts generated during the **CopyRun** stage are also available after the complete pipeline has ended.

We have reached the end of this lab. We are now ready to automate the implementation of a much more complex network topology using virtual routers.